The Definitive Guide to GTFS-realtime
How to consume and produce real-time public transportation data with the GTFS-rt specification.
Originally written by Quentin Zervaas.
About This Book
This book is a comprehensive guide to GTFS-realtime, a specification for publishing of real-time public transportation data. GTFS-realtime is designed to complement the scheduled data that hundreds of transit agencies around the world publish using GTFS (General Transit Feed Specification).
This book begins with a description of the specification, with discussion about the three types of data contained in GTFS-realtime feeds: service alerts; vehicle positions; and trip updates.
Next the reader is introduced to Protocol Buffers, the data format that GTFS-realtime uses when it is being transmitted. This section then instructs the reader how to consume the three types of data from GTFS-realtime feeds (both from standard feeds and feeds with extensions).
Finally, the reader is shown how to produce a GTFS-realtime feed. A number of examples in this book use Java, but the lessons can be applied to a number of different languages.
This book complements The Definitive Guide to GTFS.
About The Author
Quentin was the founder of TransitFeeds (now <OpenMobilityData.org>), a web site that provides a comprehensive listing of public transportation data available around the world. This site is referenced various times throughout this book.
Credits
First Edition. Published in August 2015.
Technical Reviewer
Nick Maher
Copy Editors
Anne Zervaas Miranda Little
Disclaimer
The information in this book is distributed on an “as is” basis, without warranty. Although every precaution has been taken in the preparation of this work, the author shall not be liable to any person or entity with respect to any loss or damage caused or alleged to be caused directly or indirectly by the information contained in this book.
Note
This work is licensed under the Creative Commons Attribution 4.0 International License, and was published at https://github.com/MobilityData/GTFS-books.
Introduction
1. Introduction to GTFS-realtime
GTFS-realtime is a standard developed by Google in order to allow transit agencies to provide real-time information about their service.
There are three types of data a GTFS-realtime feed provides:
- Vehicle positions
- Trip updates
- Service alerts
Vehicle positions contain data about events that have already occurred (e.g. “the vehicle was at this location one minute ago”), whereas trip updates contain data about events that are yet to occur (e.g. “the bus will arrive in three minutes”).
Typically, a single GTFS-realtime feed contains only one of these three types of data. Many agencies therefore have multiple GTFS-realtime feeds (that is, one for vehicle positions, one for trip updates and one for service alerts).
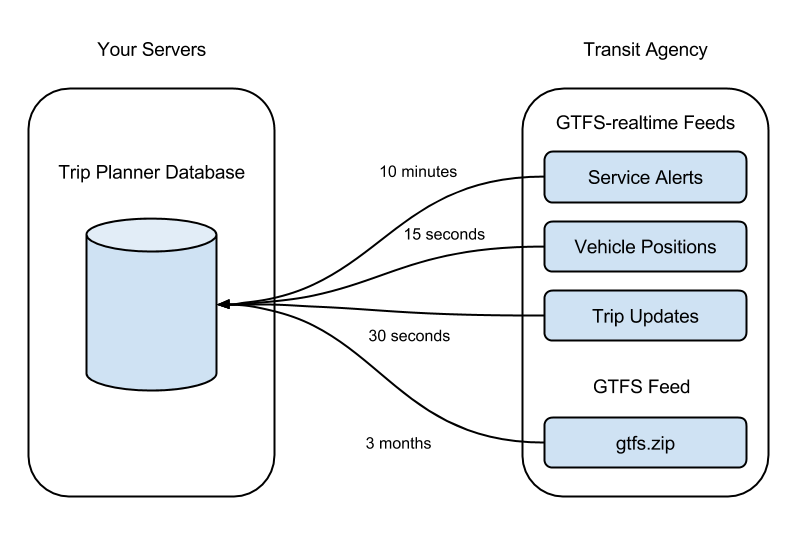
The above diagram shows how a GTFS-realtime feed is designed to complement a GTFS (General Transit Feed Specification) feed. It does this in two ways:
- All identifiers for routes, trips and stops match those that appear in the corresponding GTFS feed.
- A GTFS feed shows the projected schedule for a given period (such as the next six months), while the GTFS-realtime is used to make last-minute adjustments based on real-world conditions (such as traffic, roadworks, or weather).
Consuming GTFS-realtime Feeds
The format of GTFS-realtime feeds is based on Protocol Buffers, a language and platform-neutral mechanism for serializing structured data.
This is similar conceptually to JSON (JavaScript Object Notation), but the data transferred across the wire is binary data and not human-readable in its raw format.
Chapter 5. Protocol Buffers shows you how to use Protocol Buffers and the associated gtfs-realtime.proto file (used to instruct Protocol Buffers how GTFS-realtime is structured).
Consuming GTFS-realtime Feeds on Mobile Devices
A common use-case for GTFS and GTFS-realtime feeds is to build transit-related mobile apps that show scheduling data. However, it is important to note that GTFS-realtime feeds are not intended to be consumed directly by a mobile device.
Many of the vehicle positions and trip update feeds provided by transit agencies include a snapshot of their entire network at a single moment. For a large network, this could be multiple megabytes of data being updated every 10-15 seconds.
A mobile app downloading a full GTFS-realtime feed every 10-15 seconds would quickly download a large amount of data over their cellular connection, which could be very expensive. Additionally, their device would need to process a large amount of data – most of which would not be relevant – which would run down their battery unnecessarily. This would also put a huge amount of strain on the provider’s servers.
Rather, GTFS-realtime is intended to be consumed by an intermediate server. In the case of a mobile app, this intermediate server would likely belong to the creator of the app. The mobile app can then query this intermediate server for the relevant data it needs at that time.
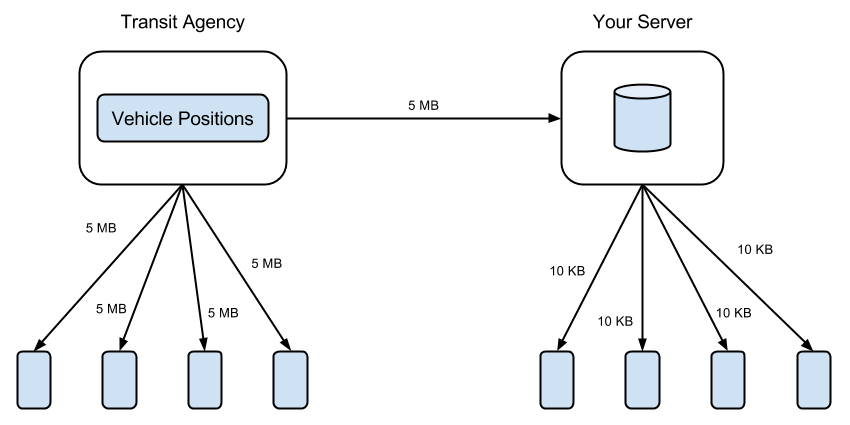
The above diagram demonstrates the different models. On the left, mobile devices download entire GTFS-realtime feeds from the provider. Each device is downloading 5 megabytes every 10-15 seconds.
On the right, an intermediate server records all vehicle positions, then mobile devices request only the data they need. This significantly reduces the amount of data transferred.
Service Alerts
2. Introduction to Service Alerts
Service alerts are generally used by transit agencies to convey information that can not be conveyed using a trip update message (the GTFS-realtime trip update message is covered in Chapter 4. Introduction to Trip Updates).
For example, consider a bus stop that was to be closed for a period of time due to construction in the area. If the stop was to be closed for a long period of time, the transit agency could modify the long-term schedule (the GTFS feed). If the closure was unexpected and the stop will reopen later that day, the agency can reflect this temporary closure using trip updates in the GTFS-realtime feed (instructing each relevant trip to skip that stop).
However, in both of these cases the reason why there were no trips visiting the stop has not been conveyed. Using a service alert, you can explain why the stop is closed and when it will reopen.
You can attach one or more entities to a service alert (such as routes, trips or stops). In the above example of a stop being closed, you could include its stop ID as it appears in the corresponding GTFS feed, thereby allowing apps consuming the feed to display a message to their users.
Examples of Service Alerts
Some examples of common service alerts used by agencies include:
- Holiday schedules. If there is an upcoming holiday, agencies may use service alerts to remind travelers that a holiday schedule will be applied that day.
- Stop closing. If a stop is closed (temporarily or permanently) customers may be notified using a service alert. In this instance, the alert can be linked to the stop that is closing. If it is being replaced by a new stop, the new stop may also be linked.
- Route detour. Service alerts can be used to indicate that for a period of time in the future a route will be redirected, perhaps due to a road closure. In this instance, the alert would link to stops that lie on the closed part of the road, as well as to routes that will detour as a result of the closure.
- Change to schedule. If an upcoming change to a schedule results in far less (or far more) services operating a stop, service alerts might be used to notify customers.
- Vehicle broken down. If a bus has broken down, or if electric trains are not moving due to a power outage, passengers can be notified using service alerts. In this instance, the alert could link to a specific trip, or it could be more general and instead link to its route or to the stops affected.
The EntitySelector type described shows how service
alerts can be linked to routes, trips and stops accordingly.
Sample Feed
The following extract is from the service alerts feed of TriMet in Portland (http://developer.trimet.org/GTFS.shtml). It contains a single GTFS-realtime service alert entity. An entity contains either a service alert, a vehicle position or a trip update. This service alert indicates that a tree has fallen, causing potential delays to two routes.
Note: This extract has been converted from its binary format into a human-readable version. Outputting Human-Readable GTFS-realtime Feeds illustrates how this is achieved.
entity {
  id: "35122"

  alert {
    active_period {
      start: 1415739180
      end: 1415786400
    }

    informed_entity {
      route_id: "19"
      route_type: 3
    }

    informed_entity {
      route_id: "71"
      route_type: 3
    }

    url {
      translation {
        text: "http://trimet.org/alerts/"
      }
    }

    description_text {
      translation {
        text: "Expect delays due to a tree down blocking northbound 52nd at Tolman. Police are flagging traffic thru using the southbound lane."
      }
    }
  }
}
The elements of this service alert entity are as follows.
- Active Period
- Informed Entity
- URL
- Description text
Each of these fields are discussed below, as are some ways this particular feed could be improved.
Active Period
The active period element in this example states that the alert is active between 12:53 PM on one day and 2:00 AM the following day (Portland time). It is likely they included this finishing time to say “this might last all day, but it definitely won’t be a problem tomorrow”.
Often precise timing isn’t known. If the active period is omitted, then the alert is assumed to be active for as long as it appears in the feed.
Informed Entity
In a GTFS-realtime service alerts feed, informed entity refers to a route, trip, stop, agency or route type, or any combination of these.
In this example, there are two informed entities, both of which are bus
routes (as indicated by a route type of 3). Referring to the TriMet
GTFS feed (http://developer.trimet.org/schedule/gtfs.zip), the routes
with an ID of 19 and 71 are as follows.
route_id,route_short_name,route_long_name,route_type
19,19,Woodstock/Glisan,3
71,71,60th Ave/122nd Ave,3
Technically in this case the route_type value need not be specified,
as this can be derived using the GTFS feed. Sometimes, however, an alert
may impact all routes for a given mode of transport, so the route type
would be specified only.
For instance, if an electrical outage affects all subway trains, then an
informed entity containing only a route type of 1 (the GTFS value
for Subway routes) would be sufficient, rather than including a service
alert for each subway route.
URL
This field contains a web address where additional information about the alert can be found.
In this particular example, TriMet has included a generic URL for their service alert. Other alerts in the same feed also use the same URL. It would be far more useful if instead each alert pointed to a URL specifically related to that alert. This would make it easier to provide the end user with additional information specific to that alert.
Description Text
This field contains a textual description of the alert that can be
presented to the users of your web site or app. Just like the URL field,
it has a type of TranslatedString, which is the mechanism by which
GTFS-realtime can provide translations in multiple languages if
required.
Improvements
In addition to providing a more specific URL, this alert could be
improved by including values for the cause and effect fields.
For instance, cause could have a value of WEATHER or
ACCIDENT, while effect could have a value of DETOUR or
SIGNIFICANT_DELAYS.
Additionally, this alert could include the header_text field to
complement the description_text field. This would allow you to
display a summary of the alert (header_text), then supply more
information if the user of your app or web site requests it
(description_text).
Specification
This section contains the specification for the Alert entity type.
Some of this information has been sourced from the GTFS-realtime
reference page
(https://developers.google.com/transit/GTFS-realtime/reference).
Alert
An Alert message makes it possible to provide extensive information
about a given service alert, including the ability to match it to any
number of routes, stops or trips.
The fields for any single service alert are as described in the following table.
| Field | Type | Frequency | Description |
|---|---|---|---|
active_period | TimeRange | Zero or more occurrences | The time or times when this alert should be displayed to the user. If no times are specified, then the alert should be considered active as long as it appears in the feed. Sometimes there may be multiple active periods specified. For example, if some construction was occurring daily between a certain time, there might be an active period record for each day it will occur. |
informed_entity | EntitySelector | Zero or more occurrences | These are the entities this service alert relates to (such as route, trips or stops). |
cause | Cause | Optional | This is the event that occurred to trigger the alert. Possible values for the Cause enumerator are listed below this table. |
effect | Effect | Optional | This indicates what action was taken as a result of the incident. Possible values for the Effect enumerator are listed below this table. |
url | TranslatedString | Optional | A URL which provides additional information that can be shown to users. |
header_text | TranslatedString | Optional | A brief summary of the alert that can be used as a heading. This is to be in plain-text (no HTML markup). |
description_text | TranslatedString | Optional | A description of the alert that complements the header text. Similarly, it is to be in plain-text (no HTML markup). |
The following values are valid for the Cause enumerator:
ACCIDENTCONSTRUCTIONDEMONSTRATIONHOLIDAYMAINTENANCEMEDICAL_EMERGENCYPOLICE_ACTIVITYSTRIKETECHNICAL_PROBLEMWEATHERUNKNOWN_CAUSEOTHER_CAUSE
The following values are valid for the Effect enumerator:
ADDITIONAL_SERVICENO_SERVICESIGNIFICANT_DELAYSDETOURSTOP_MOVEDMODIFIED_SERVICEREDUCED_SERVICEUNKNOWN_EFFECTOTHER_EFFECT
TimeRange
A TimeRange message specifies a time interval. It is not mandatory
to include both the start and finish times, but at least one of those is
required if a TimeRange is included.
| Field | Type | Frequency | Description |
|---|---|---|---|
start | uint64 (64-bit unsigned integer) | Optional | The start time specified in number of seconds since 1-Jan-1970 00:00:00 UTC. |
end | uint64 (64-bit unsigned integer) | Optional | The end time specified in number of seconds since 1-Jan-1970 00:00:00 UTC. |
If only the start time is specified, the time range is considered active after the starting time.
If only the end time is specified, the time range is considered active before the end time.
If both the start and finish times are specified, the time range is considered active between these times.
EntitySelector
An EntitySelector message is used to specify an entity from within a
GTFS feed. Doing so allows you to match up a service alert with a route
(or all routes of a given type), trip, stop or agency from the GTFS feed
that corresponds to the GTFS-realtime feed.
| Field | Type | Frequency | Description |
|---|---|---|---|
agency_id | string | Optional | This is the ID of an agency as it appears in the agency.txt file of the corresponding GTFS feed. |
route_id | string | Optional | This is the ID of a route as it appears in the routes.txt file of the corresponding GTFS feed. |
route_type | int32 (32-bit signed integer) | Optional | This is a GTFS route type, such as 3 for bus routes or 4 for ferry routes. Extended GTFS route types can also be used for this value. |
trip | TripDescriptor | Optional | This is used to match a specific trip from the corresponding GTFS feed’s trips.txt file. Trip matching can be potentially more complex than just matching the trip_id, which is why this field differs to the other ID-related fields in EntitySelector. You can find more discussion of this below in the TripDescriptor section. |
stop_id | string | Optional | This is the ID of a stop as it appears in the stops.txt file of the corresponding GTFS feed. If the corresponding stop is of type “station” (a location_type value of 1), then you may consider matching this entity to its child stops also. |
All of these elements are optional, but at least one of them must occur. If multiple elements are specified, then all must be matched.
Note: Conversely, if you want multiple matches, then you should instead include multiple EntitySelector values. For instance, if you want a service alert that covers all buses and ferries, then the informed_entity field would contain one EntitySelector for buses, and another for ferries.
The following table shows some different combinations that can occur, and what each of them mean.
| Fields Specified | Meaning |
|---|---|
agency_id | The alert applies to anything relating to the given agency. This may include any routes or trips that match back to the agency, or even stops that the trips stop at. |
route_id | The alert applies to the given route. For instance, if a user is viewing upcoming departures for the matched route, then it would be appropriate to display the alert. |
route_type | The alert is relevant when showing the user any data related to the given route type. For example, if a route type of 3 (buses) is specified, then it would be appropriate to display the alert when a user is viewing upcoming departures for any bus route in the corresponding GTFS feed. |
trip | If a trip is matched, then it would be appropriate to display the alert when the user is viewing anything related to that trip. For instance, if you are showing a list of stop times for the trip then it would be relevant. If you have received a real-time vehicle position for the trip and are showing it to the user on a map, you might show the service alert if the user taps on the vehicle. |
stop_id | If a stop is matched here then it would be appropriate to show an alert in a number of situations, such as when viewing upcoming departures for the stop, or if the user is taking a trip that embarks or disembarks at the matched stop. |
agency_id + route_id | This kind of match is redundant, because there should only ever be a maximum of one route that matches a given route_id value in a GTFS feed. |
route_id + trip | Similar to the previous case, any matched trip will only belong to a single route, so specifying the route_id has no real meaning. |
route_id + stop_id | Matching both a route and a stop can be useful if an alert relating to a stop only applies to certain routes. For instance, if a stop is serviced by two different routes and you want to notify users that one of the routes will no longer stop here, the alert does not apply to the route that will continue to service the stop. |
trip + stop_id | In this case, a service alert is matched to a combination of a trip and a stop. The alert would be relevant to a user waiting at a stop for a particular vehicle. It would not apply to other people at the same stop waiting for a different route. |
route_type + stop_id | Sometimes a stop is shared by multiple travel modes. For instance, some light rail services share stops with buses. This combination can be useful if a stop-related alert only applies to one of those modes. |
As this demonstrates, it is possible to match service alerts to real-world entities in any number of ways. This allows you to keep relevant users informed. The alternative to matching on this granular level would be to show all of your users all service alerts, meaning most alerts would be irrelevant to most people.
TripDescriptor
One of the files in a GTFS feed is frequencies.txt, which is used to
specify trips that repeat every x minutes. This file is used when an
agency does not have a specific schedule for trips, other than
guaranteeing, for instance, that a new trip departs every five minutes.
For example, it is possible for a particular route to run every five
minutes for an entire day, while only having one entry in trips.txt
(and one set of corresponding stop times in stop_times.txt).
When using trip frequencies the trip_id value may not be enough to
uniquely identify a single trip from the GTFS feed. This means that in
order to match a trip, additional information may need to be supplied,
which the TripDescriptor message allows for.
| Field | Type | Frequency | Description |
|---|---|---|---|
trip_id | string | Optional | This is the ID of a trip as it appears in the trips.txt of the corresponding GTFS feed. Alternatively, this value may refer to a trip that has been added via a TripUpdate message and does not exist in the GTFS feed. |
route_id | string | Optional | If this value is specified, it should match the route ID for the trip specified in trip_id. If the route_id is specified but no trip_id is specified, then this trip descriptor references all trips for the given route. |
direction_id | uint32 (32-bit unsigned integer) | Optional | This value corresponds to the direction_id value as specified in the trips.txt file of the corresponding GTFS feed. At time of writing this is an experimental field in the GTFS-realtime specification. |
start_time | string | Optional | If the specified trip in trip_id is a frequency-expanded trip, this value must be specified in order to determine which instance of a trip this selector refers to. Its value is in the format HH:MM:SS, as in the stop_times.txt and frequencies.txt files. |
start_date | string | Optional | It is possible that knowing the trip_id may not be enough to determine a specific trip. For instance, if a train is scheduled to depart at 11:30 PM but is running 40 minutes late, then you would need to know its date in order to match up with the original trip (40 minutes late), and not the next day’s instance of the trip (23 hours 20 minutes early). This field helps to avoid this ambiguity. The date is specified in YYYYMMDD format. |
schedule_relationship | ScheduleRelationship | Optional | This value indicates the relationship between the trip(s) specified in this selector and its regular schedule. |
The following values are valid for the ScheduleRelationship
enumerator:
SCHEDULED. Used when the trip being described is running in accordance with a trip in the GTFS feed.ADDED. A trip that was added in addition to the schedule. For instance, if an extra trip was added because there were more passengers than normal, it would be represented using this value.UNSCHEDULED. A trip that is running with no schedule associated with it. For instance, if this trip is expected to run but there is no static schedule associated with it, it would be marked with this value.CANCELED. A trip that existed in the schedule but was removed. For example, if a vehicle broke down and could not complete the trip, then it would be marked as canceled.
If a trip has been added, then the route_id should be populated, as
without this it may not be possible to determine which route the added
trip corresponds to (since the trip_id value would not appear in the
GTFS trips.txt file).
With the newly-added direction_id field (still experimental at time
of writing this book), an added trip can also have its direction
specified, meaning you can present information to your users about which
direction the vehicle is traveling, even if you do not know its specific
stops.
TranslatedString
A TranslatedString message contains one or more Translation
elements. This allows for alerts to be issued in multiple languages. A
Translation element is structured as follows.
| Field | Type | Frequency | Description |
|---|---|---|---|
text | string | Optional | A UTF-8 string containing the message. This string will typically be read by the users of your web site or app. |
language | string | Optional | This is the language code for the given text (such as en-US for United States English). It can be omitted, but if there are multiple translations then at most only one translation can have this value omitted. |
Vehicle Positions
3. Introduction to Vehicle Positions
A vehicle position message communicates the physical location of a bus, train, ferry or otherwise. In addition to location of the vehicle, it can also provide information about the vehicle’s speed, bearing (the direction it is facing), and how to match up the vehicle with a trip in the static schedule.
A recent addition to the GTFS-realtime specification (experimental at time of writing – see https://developers.google.com/transit/gtfs-realtime/changes) is the ability to indicate how full a vehicle is. Although this element is not yet formally a part of the specification, it has been included in this book so it aligns with current documentation.
Sample Feed
The following extract is from the vehicle position feed of MBTA in Boston (https://openmobilitydata.org/p/mbta/92). MBTA also provide separate feeds for service alerts and trip updates.
This extract contains a single GTFS-realtime entity, which represents a single vehicle position.
entity {
  id: "v1211"

  vehicle {
    trip {
      trip_id: "25906883"
      start_date: "20150117"
      schedule_relationship: SCHEDULED
      route_id: "28"
    }

    position {
      latitude: 42.267967
      longitude: -71.093834
    }

    current_stop_sequence: 35
    timestamp: 1421565564
    stop_id: "1721"

    vehicle {
      id: "y2189"
      label: "2189"
    }
  }
}
Note: This extract has been converted from its binary format into a human-readable version. Outputting Human-Readable GTFS-realtime Feeds shows you how this is achieved.
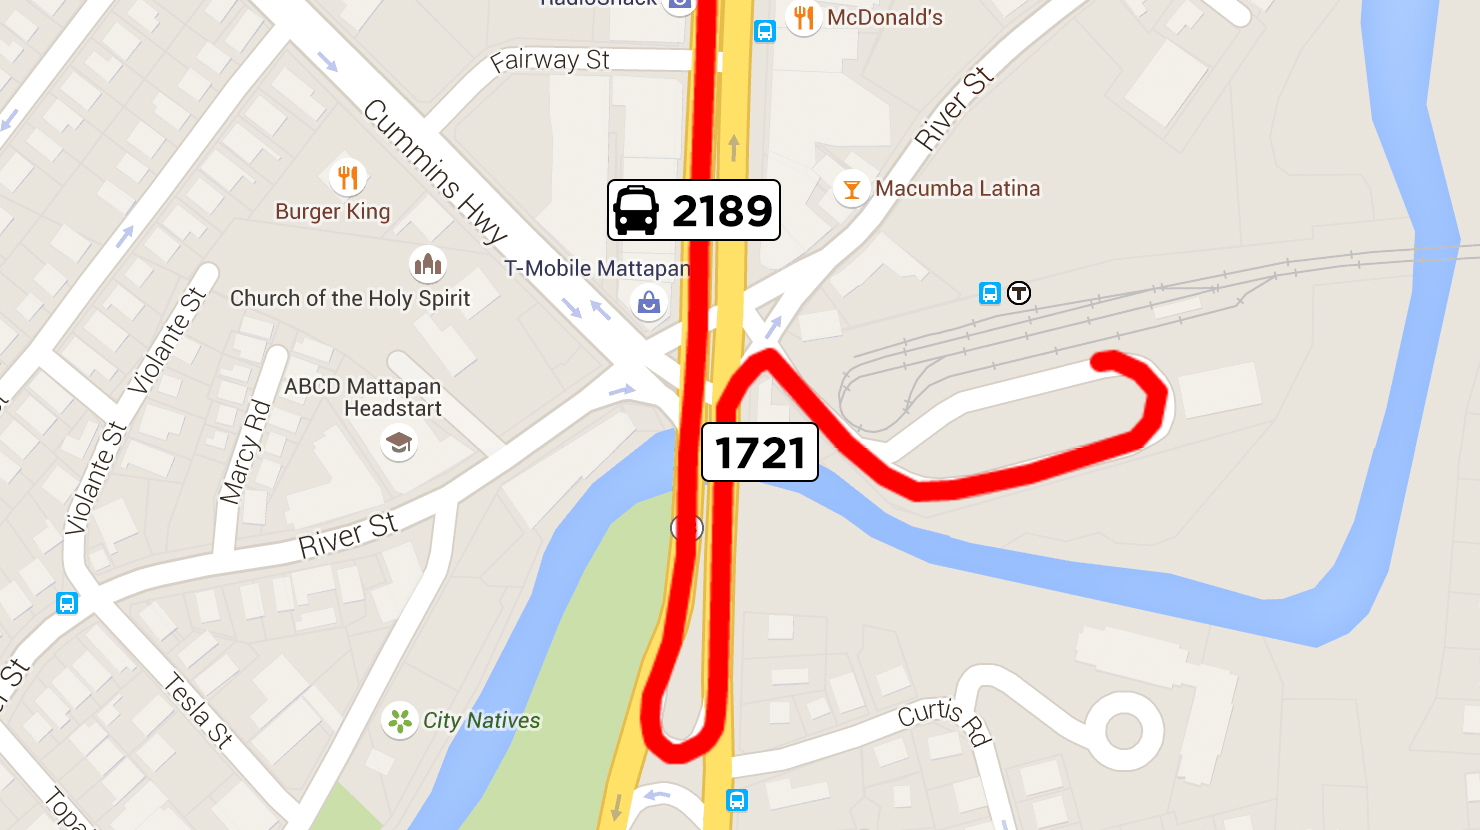
Rendering the vehicle position and its path on a map along with the referenced stop looks as follows.
The elements of the vehicle position are described below. The outer
vehicle element in this entity is of type VehiclePosition. The
inner vehicle element is a VehicleDescriptor, which is described
shortly.
Trip
If specified, this element is used to link the vehicle position to a specific trip in the corresponding GTFS feed, or to a trip that has been added to the schedule. Using MBTA’s GTFS feed, you can determine that the trip can be matched to the record below. You can find this in the trips.txt file at https://openmobilitydata.org/p/mbta/64/latest/file/trips.txt.
route_id | service_id | trip_id | trip_headsign |
|---|---|---|---|
| 28 | BUSS12015-hbs15no6-Saturday-02 | 25906883 | Mattapan Station via Dudley Station |
Note: If the schedule_relationship value was ADDED or UNSCHEDULED, there would not have been a corresponding record in trips.txt.
If you then look up the trip’s records in stop_times.txt, you can determine the trip begins at 25:45:00. This means the trip begins at 1:45 AM on the morning following its service date. In this case, the start date in the vehicle position is specified as January 17. This means that this trip actually takes place on the morning of January 18. If the start date was not included with the vehicle position, it may have been difficult to determine the specific trip being referenced.
Position
This element contains the geographic location of the vehicle. In this instance, only the latitude and longitude are specified. It is also possible to include the vehicle’s bearing, odometer and speed, however only that latitude and longitude are required.
Current Stop
A vehicle position can include information about its position relative to its current or next stop.
The status of the stop is indicated by the current_status value. In
this example, the current_status is not specified, which means the
vehicle is currently in transit to the stop (in other words, it is not
stopped there, nor is it about to stop).
The stop referred to in this instance has a stop_id of 1721.
Referring once again to the MBTA GTFS feed
(https://openmobilitydata.org/p/mbta/64/latest/stop/1721), this stop is as
follows.
stop_id | stop_code | stop_name | stop_lat | stop_lon |
|---|---|---|---|---|
| 1721 | 1721 | Blue Hill Ave @ River St | 42.267151 | -71.09362 |
The other value used to identify the upcoming or current stop is the
current_stop_sequence value. This refers to the stop_sequence
value in stop_times.txt.
Note: Technically, you can infer the stop based on the trip and
current_stop_sequence value, so you do not strictly need the stop_id
value. However, in some cases it may not be possible to identify the
trip (and therefore not be able to infer the specific stop), so having
the stop_id value available in the vehicle position is useful.
By looking up the stop ID and trip ID in stop_times.txt, you can
locate the following entry:
trip_id | stop_sequence | stop_id | arrival_time | departure_time |
|---|---|---|---|---|
| 25906883 | 35 | 1721 | 26:14:00 | 26:14:00 |
Note: Remember that an hour value of 26 corresponds to 2 AM on the following day (in this instance, the trip value specifies the trip’s date as January 17, so this stop time is 2 AM on January 18).
In plain English, this can be interpreted as “the vehicle is currently in transit to stop 1721, scheduled to arrive at 2:14 AM.” Note however, that the timestamp value corresponds to 2:19 AM, meaning the bus is about 5 minutes late.
Tip: You can quickly find the human-readable version of a timestamp using the command-line tool date. You may need to set the local timezone first. In this instance, Boston’s timezone can be set using export TZ=America/New_York. You can then use date -r 1421565564 to find the value of Sun 18 Jan 2015 02:19:24 EST.
Vehicle Descriptor
The vehicle descriptor provides information to identify the specific
vehicle. In this example, the internal vehicle identifier is y2189.
It should remain consistent for this particular vehicle across the
system. Any subsequent vehicle positions or trip updates that refer to
this vehicle should use the same identifier.
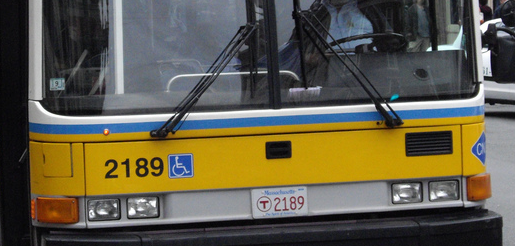
The vehicle ID value is not intended to be presented to end-users. Instead, the label field should be used. The label could refer to a particular train number, or perhaps a number painted on the side of a bus. In the case of vehicle 2189, the number appears as in the following photograph.
The other piece of identifying information that can be presented to
users is the license plate of the vehicle. The MBTA’s feed doesn’t
specify this value, presumably because it duplicates the label
value.
Improvements
Although this sample vehicle position contains the most pertinent information (the coordinates of the vehicle and its corresponding trip), knowing the direction that the vehicle is facing can also be useful.
A common way of presenting vehicle positions on a map is to show all positions for a given route on a map. If you can provide this extra piece of information, a passenger can look at a map of all vehicle positions for a given route and determine which are traveling in their desired direction, and which are traveling in the opposite direction.
Note: When you can match up a vehicle position to a specific trip,
it may be possible to filter which vehicles appear on the map using the
direction_id value for the trip. In some instances though, you may only
know the route of a vehicle and not its specific trip.
Chapter 7. Consuming Vehicle Positions shows you how to determine the bearing of a vehicle if it is not included by the data provider.
Specification
This section contains the specification for the VehiclePosition
entity type. Some of this information has been sourced from the
GTFS-realtime reference page
(https://developers.google.com/transit/GTFS-realtime/reference).
VehiclePosition
A VehiclePosition element is used to specify the geographic position
and other attributes of a single vehicle, as well as providing
information to match that vehicle back to the corresponding GTFS feed.
| Field | Type | Frequency | Description |
|---|---|---|---|
trip | TripDescriptor | Optional | This is used to match the vehicle position to a specific trip from trips.txt in the corresponding GTFS feed. |
vehicle | VehicleDescriptor | Optional | This element provides information that can be used to identify a particular vehicle. |
position | Position | Optional | The vehicle’s geographic location, bearing and speed are specified using the Position type. |
current_stop_sequence | int32 (32-bit signed integer) | Optional | The sequence of the current stop, as it appears in the stop_sequence value for the trip matched in the corresponding stop_times.txt file. |
stop_id | string | Optional | This is used to identify the current stop. If specified, the stop_id value must correspond to an entry in the stops.txt file of the corresponding GTFS feed. |
current_status | VehicleStopStatus | Optional | If the current stop is specified (using current_stop_sequence), this value specifies what the “current stop” means. If this value isn’t specified, it is assumed to be IN_TRANSIT_TO. |
timestamp | uint64 (64 bit unsigned integer) | Optional | This value refers to the moment at which the vehicle’s position was measured, specified in number of seconds since 1-Jan-1970 00:00:00 UTC. |
congestion_level | CongestionLevel | Optional | This value indicates the status of the traffic flow the vehicle is currently experiencing. The possible values for this element are listed below this table. |
occupancy_status | OccupancyStatus | Optional | At time of writing, this field is experimental only. If specified, it indicates how full a given vehicle is. |
The possible values for the VehicleStopStatus enumerator are as
follows:
| Value | Description |
|---|---|
INCOMING_AT | The vehicle is just about to arrive at the specified stop. In some vehicles, there is a visual display or audio announcement when approaching the next stop. This could correspond with current_status changing from IN_TRANSIT_TO to INCOMING_AT. |
STOPPED_AT | The vehicle is currently stationary at the stop. Once it departs the current_status would update to IN_TRANSIT_TO. |
IN_TRANSIT_TO | The vehicle has departed the previous stop and is on its way to the specified stop. This is the default value if current_status is not specified. |
The possible values for the CongestionLevel enumerator are as
follows:
| Value | Description |
|---|---|
UNKNOWN_CONGESTION_LEVEL | If the congestion level is not specified, then this is the default value. |
RUNNING_SMOOTHLY | Traffic is flowing smoothly. |
STOP_AND_GO | Traffic is flowing, but not smoothly. |
CONGESTION | The vehicle is experiencing some level of congestion, and therefore likely to be moving very slowly. |
SEVERE_CONGESTION | The vehicle is experiencing a high level of congestion, and therefore likely to be not moving. |
While this information can be useful to present to the user, it does not allow you to make any inference as to whether the vehicle will adhere to its schedule. Schedules are often designed to account for levels of congestion, depending on the time of day.
For this value to be useful in telling a user why their vehicle may be
late, the GTFS stop_times.txt would likely also need a field to
indicate the expected congestion level for any given stop time.
Realistically though, this is where the TripUpdate element comes
into play. This is covered in Chapter 4. Introduction to Trip Updates.
TripDescriptor
The meaning of the trip descriptor differs slightly for a vehicle
position than for a service alert. In a service alert, if the
route_id is specified but the trip_id is not, then the service
alert applies to all trips for that route.
In the case of a vehicle position, if the route_id is specified but
not the trip_id, then it means the vehicle position corresponds to
“some” trip for that route, not “all” trips (it does not make sense for
it to apply to all trips).
This means that if a user wants to know the vehicle positions for a given route, you can show them all known positions, even if you are unable to match the trip back to a trip in the corresponding GTFS feed.
Refer to Chapter 4 for a description of all elements in a
TripDescriptor.
VehicleDescriptor
This element is used to identify a specific vehicle, both internally and for passengers. Every single vehicle in the system must have its own identifier, and it should carry across all vehicle positions and trip updates that correspond to the specific vehicle.
| Field | Type | Frequency | Description |
|---|---|---|---|
id | string | Optional | A unique identifier for a vehicle. This value is not intended to be shown to passengers, but rather for identifying the vehicle internally. |
label | string | Optional | A label that identifies the vehicle to passengers. Unlike the id value, this value may be repeated for multiple vehicles, and it may change for a given vehicle over the course of a trip or series of trips. This might correspond to a route number that is displayed on a bus, or a particular train number, or some other identifier that passengers can see. |
license_plate | string | Optional | The license plate of the vehicle. |
Position
This element specifies the geographic position of a vehicle, as well as related attributes such as bearing and speed.
| Field | Type | Frequency | Description |
|---|---|---|---|
latitude | float | Required | The latitude of the vehicle (a number in the range of -90 to 90). |
longitude | float | Required | The longitude of the vehicle (a number in the range of -180 to 180). |
bearing | float | Optional | Degrees, clockwise from True North. 0 is North, 90 is East, 180 is South, 270 is West. This can be either the direction the vehicle is facing, or the direction towards the next stop (GTFS-realtime does not provide a mechanism to determine which). |
odometer | double | Optional | A measure of distance in meters. The GTFS-realtime specification does not state exactly what this value should represent. It could represent either the total number of meters the vehicle has ever travelled, or the number of meters travelled since the beginning of its current trip. |
speed | float | Optional | The speed of the vehicle at the time of the reading, in meters per second. |
While the latitude and longitude are the most important pieces of information in this element, the vehicle’s bearing can also be useful to know. Determining a Vehicle’s Bearing shows you how to determine the bearing if it is not specified.
OccupancyStatus
Warning: At time of writing the OccupancyStatus enumerator is considered experimental only.
This enumerator is used for indicating how full a vehicle is. This can be useful for warning passengers waiting for this vehicle that they may not be able to fit and should instead attempt to use a different vehicle.
| Value | Description |
|---|---|
EMPTY | Used to indicate there are no (or very few) passengers on board. |
MANY_SEATS_AVAILABLE | The vehicle is not empty, but it has many seats available. |
FEW_SEATS_AVAILABLE | The vehicle has some seats available and is still accepting passengers. |
STANDING_ROOM_AVAILABLE | The vehicle is still accepting passengers, but they will have to stand. |
CRUSHED_STANDING_ROOM_ONLY | The vehicle is still accepting passengers, but they will have to stand and there is very limited space. |
FULL | The vehicle is considered full but may still be accepting new passengers |
NOT_ACCEPTING_PASSENGERS | The vehicle is not accepting new passengers. |
Trip Updates
4. Introduction to Trip Updates
A trip update message is used to report the progress of a vehicle along its trip. Each trip may only have one trip update message in a GTFS-realtime feed.
A trip update can report that a trip has been canceled, or it can update the progress of any number of stops on the trip. For example, a trip update may contain an arrival estimate only for the vehicle’s next stop, or it may contain estimates for every remaining stop on the trip.
If a trip does not have a trip update message, this should be interpreted as there being no real-time information available; not that it is necessarily progressing as scheduled.
Sample Feed
The following extract is from the MBTA trip update feed (https://openmobilitydata.org/p/mbta/91). MBTA also provide separate feeds for service alerts and vehicle positions.
This extract contains a single GTFS-realtime entity, which represents a
bus that is four minutes behind schedule (a delay value of 240
seconds).
entity {
  id: "25732950"

  trip_update {
    trip {
      trip_id: "25732950"
      start_date: "20150120"
      schedule_relationship: SCHEDULED
      route_id: "08"
    }

    stop_time_update {
      stop_sequence: 43
      arrival {
        delay: 240
      }
      stop_id: "135"
    }

    vehicle {
      id: "y2189"
      label: "2189"
    }
  }
}
Note: This extract has been converted from its binary format into a human-readable version. Outputting Human-Readable GTFS-realtime Feeds shows you how this is achieved.
The elements of a trip_update entity are as follows.
Trip
This element is used to identify the particular trip that a trip update
applies to. In this instance, the trip has an ID of 25732950,
running on the service day of 20 January 2015.
Note: Although this trip may no longer be active, you can view similar trips at https://openmobilitydata.org/p/mbta/64/latest/route/8.
Since the schedule_relationship value is SCHEDULED, this trip
corresponds to a trip in the MBTA GTFS file
(https://openmobilitydata.org/p/mbta/64).
If the schedule_relationship value is ADDED, then this
corresponds to a new trip for the route with an ID of 08. The
stop_time_added field would likely then contain an entry for each
stop on the added trip.
Note: The trip could also be marked as CANCELED. If so, the trip could either be in the GTFS feed or it may have been added through a previous trip update message.
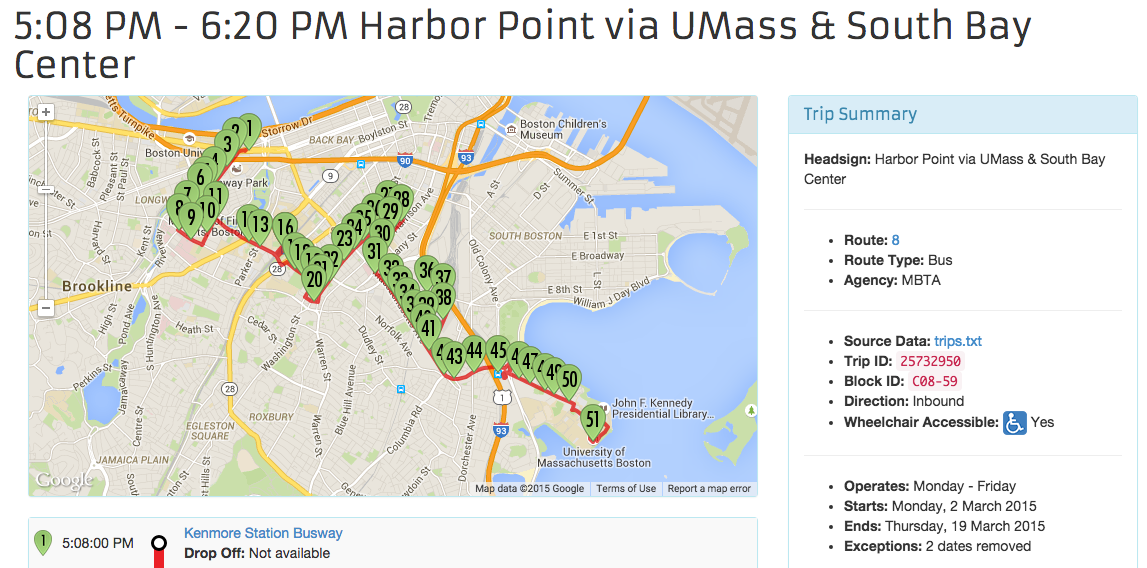
Stop Time Update
The stop_time_update elements contains information specific to a
stop on the trip. It is repeated for each stop that there is information
for. If the trip has been canceled (indicated by a
schedule_relationship value of CANCELED) then there will no
stop_time_update elements.
In the above sample, there is a single update, corresponding to the stop
with an ID of 135. You can look up the details of this stop at
https://openmobilitydata.org/p/mbta/64/latest/stop/135. This stop has a
stop sequence of 43, as shown in the following figure.
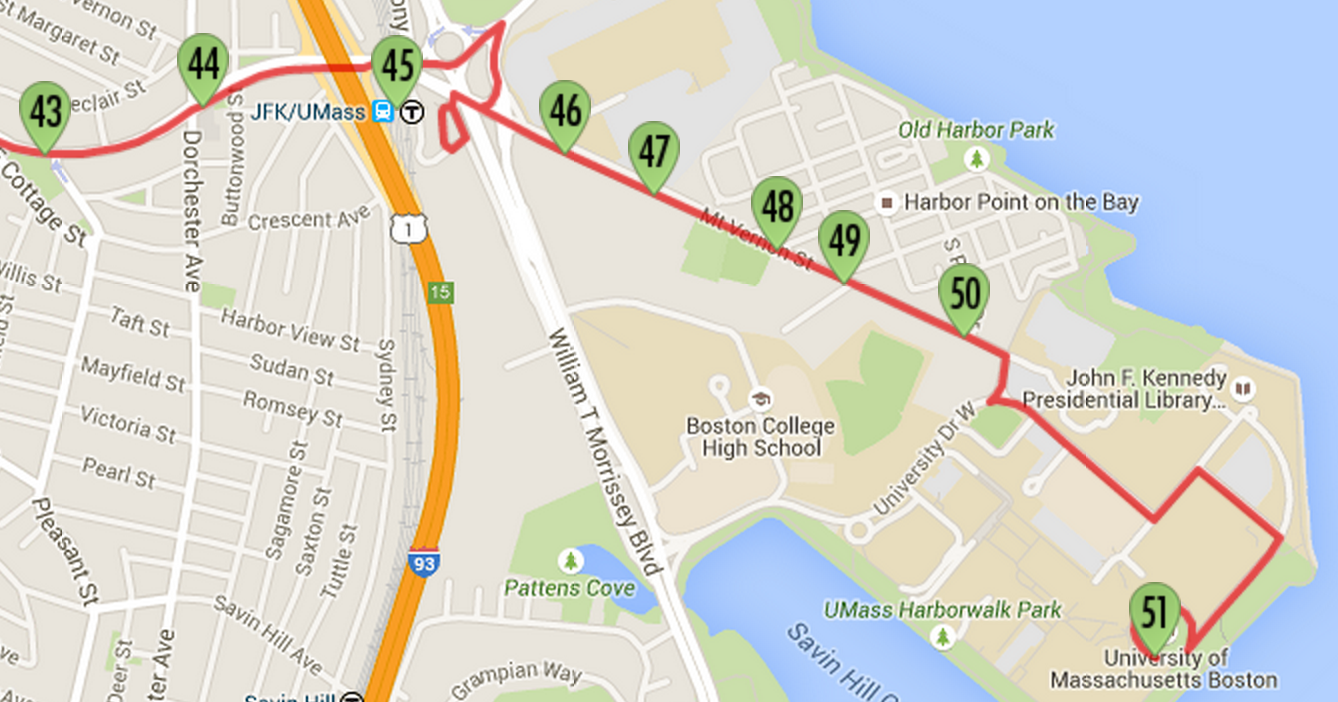
Referring to the stop_times.txt file in the GTFS feed, the scheduled
arrival time for this trip at stop 135 is 6:12 PM. The delay value
indicates that it will be four minutes late (240 seconds), meaning it
will now arrive at 6:16 PM.
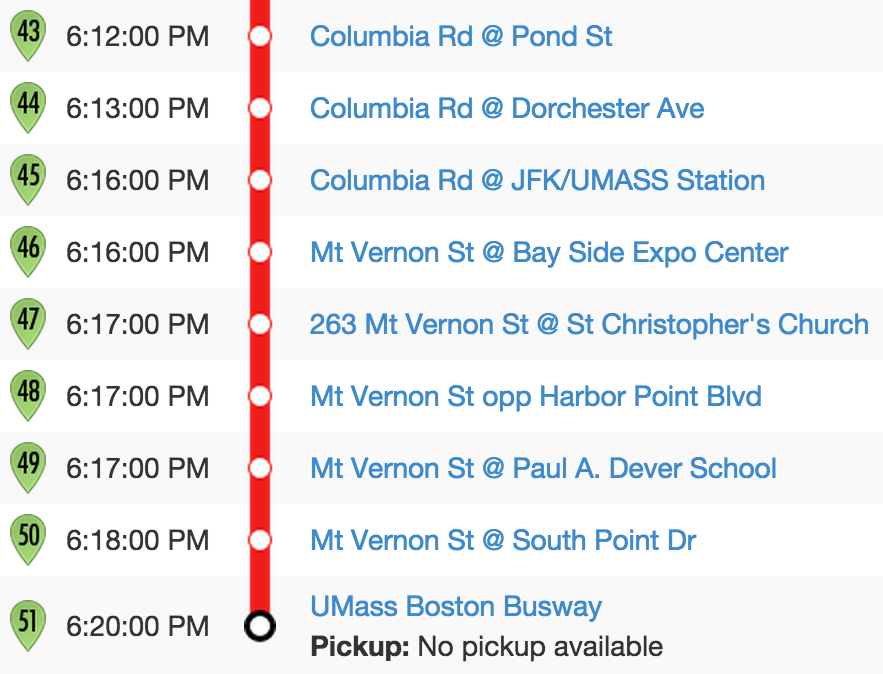
As there are no additional stop time updates for subsequent updates, it can be assumed that this delay carries through to the rest of the trip. There are eight remaining stops after this one, so all of those will also be four minutes late.
Vehicle
The vehicle information is useful as it enables you to identify specific
vehicles. In this instance, MBTA use the same identifier both as their
internal identifier and also as the identifier printed on the bus. This
sample once again refers to bus 2189. The photograph in Chapter 3: Vehicle Positions
shows how this number appears on the vehicles.
Specification
This section contains the specification for the VehiclePosition
entity type. Some of this information has been sourced from the
GTFS-realtime reference page
(https://developers.google.com/transit/GTFS-realtime/reference).
TripUpdate
| Field | Type | Frequency | Description |
|---|---|---|---|
trip | TripDescriptor | Optional | This element is used to match the referenced trip to trips.txt file from the corresponding GTFS feed. |
vehicle | VehicleDescriptor | Optional | This element provides information that can be used to identify a particular vehicle. |
stop_time_update | StopTimeUpdate | Repeated | This element contains one or more instances of StopTimeUpdate. Each occurrence represents a prediction for a single stop. They must be in order of their stop sequence. |
timestamp | uint64 (64-bit unsigned integer) | Optional | This value refers to the moment at which the real-time progress was measured, specified in number of seconds since 1-Jan-1970 00:00:00 UTC. |
delay | int32 (32-bit signed integer) | Optional | This value is only experimental at time of writing. It is used to indicate the number of seconds the vehicle is either early (negative number) or late (positive number). Estimates specified within StopTimeUpdate elements take precedence over this value. |
TripDescriptor
Identifying a trip in a trip update is slightly different to identifying a trip in a service alert or vehicle position message. With vehicle positions and service alerts, the trip descriptor may refer to an arbitrary trip for a given route, but to do so with trip updates does not make sense.
With trip updates, you must be able to identify a specific trip from the corresponding GTFS feed. This is because trip updates will often only include an update for a single stop, and you must therefore determine subsequent stop times for a given trip so those can be adjusted accordingly. To do so, you need to be able to find a specific trip and its corresponding stop times in the GTFS feed.
This differs to a service alert where you can apply an alert to all trips for a given route, rather than one at a specific time. It also differs to vehicle positions, where being able to see all positions for a route on a map is useful, even if you do not know the specific trip each position corresponds to.
VehicleDescriptor
This element is used to identify a specific vehicle, both internally and for passengers. Every single vehicle in the system must have its own identifier, and it should carry across all vehicle positions and trip updates that correspond to the specific vehicle.
| Field | Type | Frequency | Description |
|---|---|---|---|
id | string | Optional | A unique identifier for a vehicle. This value is not intended to be shown to passengers, but rather for identifying the vehicle internally. |
label | string | Optional | A label that identifies the vehicle to passengers. Unlike the id value, this value may be repeated for multiple vehicles, and it may change for a given vehicle over the course of a trip or series of trips. This might correspond to a route number that is displayed on a bus, or a particular train number, or some other identifier that passengers can see. |
license_plate | string | Optional | The license plate of the vehicle. |
StopTimeUpdate
| Field | Type | Frequency | Description |
|---|---|---|---|
stop_sequence | uint32 (32-bit unsigned integer) | Optional | In GTFS feeds, the order of stops in a trip is indicated by the stop_sequence value in stop_times.txt. If specified, the value specified in the StopTimeUpdate must match the value from the GTFS feed. It is possible for a single trip to make multiple visits to a single stop (for example, if it’s a loop service), so this value is important. |
stop_id | string | Optional | This value corresponds to a single stop from the associated GTFS feed. Using this value and the stop_sequence value, it is possible to pinpoint a specific record from stop_times.txt that this StopTimeUpdate element alters. |
arrival | StopTimeEvent | Optional | Specifies the updated arrival time. If the schedule_relationship is SCHEDULED, then this field and/or departure must be specified. |
departure | StopTimeEvent | Optional | Specifies the updated departure time. If the schedule_relationship is SCHEDULED, then this field and/or arrival must be specified. |
schedule_relationship | ScheduleRelationship | Optional | If no value is specified, this defaults to SCHEDULED. Other possible values and their meanings are as described below. |
Valid values for the ScheduleRelationship enumerator are:
| Value | Description |
|---|---|
SCHEDULED | Indicates this stop occurs in accordance with the scheduled trip, although the arrival or departure times may be different from the times listed in the GTFS stop_times.txt file. |
SKIPPED | Indicates that the corresponding stop will be skipped for the given trip. The arrival or departure times may still be included, but the vehicle will not be stopping. |
NO_DATA | This is the value that should be used if no real-time information is available for this stop. In this case, neither arrival nor departure should be specified (if they are, you can safely ignore them). |
StopTimeEvent
| Field | Type | Frequency | Description |
|---|---|---|---|
delay | int32 (32-bit signed integer) | Optional | The number of seconds that a vehicle is early (a negative value) or late (a positive value). A value of 0 indicates the vehicle is exactly on time. |
time | int64 (64-bit signed integer) | Optional | The time of the arrival or departure, specified in number of seconds since 1-Jan-1970 00:00:00 UTC. |
uncertainty | int32 (32-bit signed integer) | Optional | Represents the level of uncertainty attached to this prediction in seconds. A value of 0 means is it completely certain, while an omitted value means an unknown level of uncertainty. |
Either the delay or exact time must be specified. If both are specified,
then the scheduled time in GTFS added to the delay should equal the
time value. If it does not, just the time value can be used.
Conversely, if the delay value is not specified, you can calculate
it by subtracting the GTFS scheduled time from the predicted time
value.
Note: Your interpretation of what constitutes a delay is likely to depend on how you are presenting real-time data. For instance, if you present arrivals to your users as “Early”, “On-Time” and “Late”, it is likely to be more useful to your users to indicate a 30-second delay as being “On-Time” rather than “Late”.
The uncertainty field is used to indicate the accuracy of the
prediction. For example, consider a prediction that indicates a bus will
be five minutes late. If the transit agency thinks the prediction is
within a minute on either side of five minutes (say, 4-6 minutes late),
then the uncertainty value is the difference between the minimum and
maximum value. In this example, the uncertainty is 2 minutes – a value
of 120 seconds.
Protocol Buffers
5. Protocol Buffers
The previous chapters have included extracts from GTFS-realtime feeds in a human-readable format. This data is actually represented using a data format called Protocol Buffers.
Developed by Google and initially released in 2008, Protocol Buffers are a way of serializing structured data into a format which is intended to be smaller and faster than XML.
Note: Remember, if you are writing a transit-related mobile app, GTFS-realtime feeds are not intended to be consumed directly by mobile devices due to the large amount of data transferred. Rather, you will need an intermediate server to read the feed from the provider then serve only relevant data to the mobile devices running your app.
Even though it looks similar to JSON data, the human-readable version of a protocol buffer is not intended to be manually parsed. Instead, data is extracted from a protocol buffer using native language (such as Java, C++ or Python).
Note: Although the Protocol Buffers application can generate code in Java, C++ or Python, all code examples in this book will be in Java.
For example, assume you have written a Java program that reads and parses a GTFS-realtime service alerts feed (shown later in this chapter, and in the next chapter).
In order to consume a GTFS-realtime feed provided by a transit agency such as TriMet or MBTA, your workflow would look similar to the following diagram:
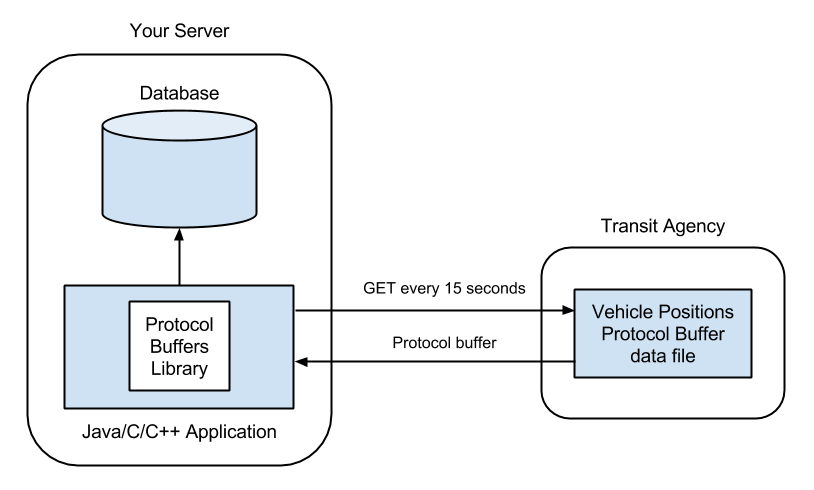
When a transit agency or data provider want to publish a GTFS-realtime feed, their process would be similar, except instead of reading the feed every 15 seconds, they would write a new protocol buffer data file every 15 seconds using data received from their vehicles.
Note: Chapter 11. Publishing GTFS-realtime Feeds will show you how to create a GTFS-realtime feed using Protocol Buffers. In order to do so, you will need to install Protocol Buffers as demonstrated in this chapter.
Installing Protocol Buffers
In order to generate code to read or write GTFS-realtime feeds in your native language, you first need to install Protocol Buffers. Once installed, it is capable of generating code for Java, C++ or Python.
This section shows you how to download and build the protoc
command-line tool on a UNIX or Linux-based system. These instructions
were derived from installing Protocol Buffers on Mac OS X 10.10.
First, download and extract the Protocol Buffers source code. At the time of writing, the current version is 2.6.1.
$ curl -L \
    https://github.com/google/protobuf/releases/download/v2.6.1/protobuf-2.6.1.tar.gz \
    -o protobuf-2.6.1.tar.gz

$ tar -zxf protobuf-2.6.1.tar.gz

$ cd protobuf-2.6.1
Note: Visit https://developers.google.com/protocol-buffers/ and click the “Download” link to find the latest version. The following instructions should still work for subsequent versions.
Next, compile the source files using make. First run the
configure script to build the Makefile, then run make.
$ ./configure && make
Note: Separating the commands by && means that make will only run if
./configure exits successfully.
Once compilation is complete, you can verify the build by running make
check. You can then install it globally on your system using make
install. If you do not want to install it globally, you can run
protoc directly from the ./src directory instead.
$ make check

$ make install
Next verify that it has been successfully built and installed by running
the protoc command. The output should be “Missing input file.”
$ protoc

Missing input file.
The next section will show you how to generate Java files using
protoc and the gtfs-realtime.proto file.
Introduction to gtfs-realtime.proto
In order to generate source code files that can read a protocol buffer,
you need a .proto input file. Typically you won’t need to create or
modify .proto files yourself, it is useful to have a basic
understanding of how they work.
A .proto file contains a series of instructions that defines the
structure of the data. In the case of GTFS-realtime, there is a file
called gtfs-realtime.proto which contains the structure for each of
the messages available (service alerts, vehicle positions and trip
updates).
The following is an extract from gtfs-realtime.proto for the
VehiclePosition message.
**Note: **The TripDescriptor and VehicleDescriptor types
referenced in this extract also have declarations, which are not
included here.
message VehiclePosition {
    optional TripDescriptor trip = 1;
    optional Position position = 2;
    optional uint32 current_stop_sequence = 3;

    enum VehicleStopStatus {
        INCOMING_AT = 0;
        STOPPED_AT = 1;
        IN_TRANSIT_TO = 2;
    }

    optional VehicleStopStatus current_status = 4 [default = IN_TRANSIT_TO];
    optional uint64 timestamp = 5;

    enum CongestionLevel {
        UNKNOWN_CONGESTION_LEVEL = 0;
        RUNNING_SMOOTHLY = 1;
        STOP_AND_GO = 2;
        CONGESTION = 3;
        SEVERE_CONGESTION = 4;
    }

    optional CongestionLevel congestion_level = 6;
    optional string stop_id = 7;
    optional VehicleDescriptor vehicle = 8;
    extensions 1000 to 1999;
}
Ignoring the numerical values assigned to each field (they aren’t likely to be relevant because you never directly refer to them), you can see how the structure is the same as the specification covered earlier in this book for vehicle positions.
Each field in a protocol buffer has a unique value assigned to it. This value is used internally when encoding or decoding each field in GTFS-realtime feed. If there is additional data to be represented in a feed, the values between 1000 and 1999 are reserved for extensions. Chapter 10. GTFS-realtime Extensions shows how extensions in GTFS-realtime work.
Compiling gtfs-realtime.proto
The next step towards consuming a GTFS-realtime feed is to compile the
gtfs-realtime.proto file into Java code using protoc. In order
to do this, you must have already created a Java project ahead of time.
protoc will generate the files and incorporate them directly into
your project’s source tree.
These instructions assume you have created your Java project in
/path/to/gtfsrt and that you will download the
gtfs-realtime.proto file to /path/to/protobuf.
First, download the gtfs-realtime.proto file.
$ cd /path/to/protobuf

$ curl \
    https://developers.google.com/transit/gtfs-realtime/gtfs-realtime.proto \
    -o gtfs-realtime.proto
Note: If this URL is no longer current when you read this, you can find the updated location at https://developers.google.com/transit/gtfs-realtime/.
In order to use protoc, you must specify the –proto_path
argument as the directory in which gtfs-realtime.proto resides.
Additionally, you must specify the full path to the
gtfs-realtime.proto file.
Typically, in a Java project your source files will reside in a
directory called src within the project directory. This directory
must be specified in the –java_out argument.
The full command to run is as follows:
$ protoc \
    --proto_path=/path/to/protobuf \
    --java_out=/path/to/gtfsrt/src \
    /path/to/protobuf/gtfs-realtime.proto
If this command runs successfully there will be no output to screen, but
there will be newly-created files in your source tree. There should now
be a ./com/google directory in your source tree, and a package
called com.google.transit.realtime.
Adding the Protocol Buffers Library
Before you can use this new package, you must add the Protocol Buffers library to your Java project. You can either compile these files into a Java archive (using the instructions in ./protobuf-2.6.1/java/README.txt), or you can add the Java source files directly to your project as follows:
$ cd protobuf-2.6.1

$ cp -R ./java/src/main/java/com/google/protobuf \
    /path/to/gtfsrt/src/com/google/
If you now try to build your project, an error will occur due to a
missing package called DescriptorProtos. You can add this to your
project using the following command:
$ cd protobuf-2.6.1

$ protoc --java_out=/path/to/gtfsrt/src \
    --proto_path=./src \
    ./src/google/protobuf/descriptor.proto
Your project should now build successfully, meaning you can use the
com.google.transit.realtime package to read data from a
GTFS-realtime feed.
Reading Data From a GTFS-realtime Feed
To read the data from a GTFS-realtime feed, you need to build a
FeedMessage object. The simplest way to do this is by opening an
InputStream for the URL of the GTFS-realtime feed.
The following code builds a FeedMessage for the vehicle positions
feed of the MBTA in Boston.
Note: To simplify the code listings in this book, package imports are not included. All classes used are either standard Java classes, or classes generated by Protocol Buffers.
public class YourClass {
    public void loadFeed() throws IOException {

        URL url = new URL("http://developer.mbta.com/lib/gtrtfs/Vehicles.pb");

        InputStream is = url.openStream();

        FeedMessage fm = FeedMessage.parseFrom(is);

        is.close();

        // ...
    }
}
A FeedMessage object contains zero or more entities, each of which
is either a service alert, a vehicle position, or a trip update. You can
retrieve a list of entities using getEntityList(), then loop over
them as follows:
public class YourClass {
    public void loadFeed() throws IOException {

    // ...

    for (FeedEntity entity : fm.getEntityList()) {
        // Process the entity here
    }

    // ...

    }
}
Since many of the fields in GTFS-realtime are optional, you need to
check for the presence of the field you want to use before trying to
retrieve it. This is achieved using hasFieldName(). You can
then retrieve it using getFieldName().
In the case of FeedEntity, you need to check which of the
GTFS-realtime messages are available. For instance, to check if the
entity contains a service alert, you would call entity.hasAlert().
If the call to hasAlert() returns true, you can retrieve it
using entity.getAlert().
The following code shows how to access the various entities.
public class YourClass {
    public void loadFeed() throws IOException {
        // ...

        for (FeedEntity entity : fm.getEntityList()) {

            if (entity.hasAlert()) {
                Alert alert = entity.getAlert();

                // Process the alert here
            }

            if (entity.hasVehicle()) {
                VehiclePosition vp = entity.getVehicle();

                // Process the vehicle position here
            }

            if (entity.hasTripUpdate()) {
                TripUpdate tu = entity.getTripUpdate();

                // Process the trip update here
            }
        }

        // ...

    }
}
The next three chapters will show you how to process the Alert, VehiclePosition and TripUpdate objects.
Outputting Human-Readable GTFS-realtime Feeds
Earlier chapters included human-readable extracts from GTFS-realtime feeds. Although plain-text GTFS-realtime feeds are not designed to be parsed directly, they can be useful for quickly determining the kinds of data available within a feed.
All objects in a GTFS-realtime feed can be output using the
TextFormat class in the protobuf package. Passing the object to
printToString() will generate a human-readable version of the
GTFS-realtime element.
For instance, you can output an entire feed as follows:
FeedMessage fm = ...;

String output = TextFormat.printToString(fm);

System.out.println(output);
Or you can output individual entities:
for (FeedEntity entity : fm.getEntityList()) {
    String output = TextFormat.printToString(entity);

    System.out.println(output);
}
Alternatively, you can call the toString() method on these objects
to generate the same output.
Consuming Service Alerts
6. Consuming Service Alerts
The previous chapter introduced you to Protocol Buffers and showed you how load a remote GTFS-realtime feed into your Java project. This chapter will show you how to read the data from each of the three entity types (service alerts, vehicle positions and trip updates).
The previous chapter also showed you how to loop over all entities in a
feed using getEntityList(). Each entity contains either a service
alert, a vehicle position or a trip update.
Once you have verified that a FeedEntity element contains an alert,
you can retrieve the corresponding Alert object using
getAlert().
for (FeedEntity entity : fm.getEntityList()) {
	if (entity.hasAlert()) {
		Alert alert = entity.getAlert();

		processAlert(alert);
	}
}
You can then access the specific properties of a service alert using the returned object.
Cause & Effect
For example, to retrieve the cause value for the alert, you would first
check for its presence with hasCause() then retrieve the value using
getCause().
public void processAlert(Alert alert) {
	if (alert.hasCause()) {
		Cause cause = alert.getCause();

		// ...
	}

	// ...
}
The Cause object is an enumerator, meaning it has a finite number of
possible values. To determine which value the object corresponds to,
call getNumber() to compare it to the possible values.
switch (cause.getNumber()) {
	case Cause.ACCIDENT_VALUE:
		// ...

	case Cause.MEDICAL_EMERGENCY_VALUE:
		// ...
}
Note: There are other possible cause values to include in the switch statement; these have been omitted here as they are all covered in the specification earlier in this book.
The Effect field works in the same way. The difference is that the
possible list of values to compare against is different.
if (alert.hasEffect()) {
	Effect effect = alert.getEffect();

	switch (effect.getNumber()) {
	case Effect.DETOUR_VALUE:
		// ...

	case Effect.SIGNIFICANT_DELAYS_VALUE:
		// ...
	}
}
Title, Description and URL
Each of these fields are of type TranslatedString. A
TranslatedString may contain multiple Translation objects, so
when processing these fields you must loop over the available
translations.
For example, to loop over the available translations for the header text you iterate over getTranslationList().
if (alert.hasHeaderText()) {
	TranslatedString header = alert.getHeaderText();

	for (Translation translation : header.getTranslationList()) {
		// Process the translation here

	}
}
Note: To access the description you would use hasDescription() and
getDescription(), while to access the URL you would use hasUrl() and
getUrl().
Alternatively, you can use getTranslationCount() and
getTranslation() to retrieve each of the available translations.
for (int i = 0; i < header.getTranslationCount(); i++) {
	Translation translation = header.getTranslation(i);

	// Process the translation here
}
A Translation object is made up of text and optionally, its
associated language. When dealing with the URL field, the text retrieved
from getText() contains a full URL.
if (translation.hasLanguage()) {
	String language = translation.getLanguage();

	if (language.equals("fr")) {
		// Do something for French language
	}
	else {
		// All other languages
	}
}

if (translation.hasText()) {
	String text = translation.getText();

	// Do something with the text
}
Note: Most GTFS-realtime feeds only specify text in a single language, and therefore do not include the language value.
Active Period
A service alert may contain zero or more time ranges, each of which specify the dates and times the alert is active for. If none are specified then the alert is active as long as it exists within the feed.
You can access each of the TimeRange objects using either of the
following methods:
for (TimeRange timeRange : alert.getActivePeriodList()) {
	// ...
}

for (int i = 0; i < alert.getActivePeriodCount(); i++) {
	TimeRange timeRange = alert.getActivePeriod(i);

	// ...
}
A TimeRange can have either a start or finish date, or it may
contain both. In Java, you can turn each of these dates into a
java.util.Date object as shown below.
if (timeRange.hasStart()) {
	Date start = new Date(timeRange.getStart() * 1000);

	// ...
}

if (timeRange.hasEnd()) {
	Date end = new Date(timeRange.getEnd() * 1000);

	// ...
}
Note: The date value is multiplied by 1,000 because the date in the
GTFS-realtime is represented by the number of seconds since January 1,
1970, while java.util.Date is instantiated using the number of
milliseconds since the same date.
Affected Entities
A service alert may contain zero or more affected entities, each of which describes a route, stop, agency, trip or route type. You can access these entities using either of the following methods:
for (EntitySelector entity : alert.getInformedEntityList()) {

}

for (int i = 0; i < alert.getInformedEntityCount(); i++) {
	EntitySelector entity = alert.getInformedEntity(i);

}
There are a number of properties available in the EntitySelector
object, each of which can be used to match the entity to the
corresponding GTFS feed.
For example, if the EntitySelector object has a route ID value, then
you should be able to locate the route in the corresponding GTFS feed’s
routes.txt file.
The properties can be accessed as follows:
if (entity.hasAgencyId()) {
	String agencyId = entity.getAgencyId();

}

if (entity.hasRouteId()) {
	String routeId = entity.getRouteId();

}

if (entity.hasRouteType()) {
	int routeType = entity.getRouteType();

}

if (entity.hasStopId()) {
	String stopId = entity.getStopId();

}
The route type value is an Integer and if present must correspond either to the standard GTFS route type values, or to the extended route type values.
The other entity information that can be contained in EntitySelector
is trip information. You can access the trip properties as follows:
if (entity.hasTrip()) {
	TripDescriptor trip = entity.getTrip();

	if (trip.hasTripId()) {
		String tripId = trip.getTripId();

	}

	if (trip.hasRouteId()) {
		String routeId = trip.getRouteId();

	}

	if (trip.hasStartDate()) {
		String startDate = trip.getStartDate();

	}

	if (trip.hasStartTime()) {
		String startTime = trip.getStartTime();

	}

	if (trip.hasScheduleRelationship()) {
		ScheduleRelationship sr = trip.getScheduleRelationship();

	}
}
You can test the ScheduleRelationship value by comparing the
getNumber() value to one of the available constants, as follows.
if (entity.hasTrip()) {
	// ...

	if (trip.hasScheduleRelationship()) {

		ScheduleRelationship sr = trip.getScheduleRelationship();

		switch (sr.getNumber()) {
			case ScheduleRelationship.ADDED_VALUE:
				// ...
				break;

			case ScheduleRelationship.CANCELED_VALUE:
				// ...
				break;

			case ScheduleRelationship.SCHEDULED_VALUE:
				// ...
				break;

			case ScheduleRelationship.UNSCHEDULED_VALUE:
				// ...
				break;
		}
	}
}
Consuming Vehicle Positions
7. Consuming Vehicle Positions
Just like when consuming service alerts, you can loop over the
FeedEntity objects returned from getEntityList() to process
vehicle positions. If an entity contains a vehicle position, you can
retrieve it using the getVehicle() method.
for (FeedEntity entity : fm.getEntityList()) {
    if (entity.hasAlert()) {
        VehiclePosition vp = entity.getVehicle();
        processVehiclePosition(vp);
    }
}
You can then process the returned VehiclePosition object to extract
the details of the vehicle position.
Timestamp
One of the provided values is a timestamp reading of when the vehicle position reading was taken.
if (vp.hasTimestamp()) {
    Date timestamp = new Date(vp.getTimestamp() * 1000);

}
Note: The value is multiplied by 1,000 because the java.util.Date class accepts milliseconds, whereas GTFS-realtime uses whole seconds.
This value is useful because the age of a reading can dictate how the data is interpreted. For example, if your latest reading was only thirty seconds earlier, your users would realize it is very recent and therefore is probably quite accurate. On the other hand, if the latest reading was ten minutes earlier, they would see it had not updated recently and may therefore not be completely accurate.
The other way this value is useful is for determining whether to store this new vehicle position. If your previous reading for the same vehicle has the same timestamp, you can ignore this update, as nothing has changed.
Geographic Location
A VehiclePosition object contains a Position object, which
contains a vehicle’s latitude and longitude, and may also include other
useful information such as its bearing and speed.
public static void processVehiclePosition(VehiclePosition vp) {
    if (vp.hasPosition()) {
        Position position = vp.getPosition();

        if (position.hasLatitude() && position.hasLongitude()) {
            float latitude = position.getLatitude();
            float longitude = position.getLongitude();

            // ...
        }

        // ...
    }
}
Even though the Position element of a VehiclePosition is
required (according to the specification), checking for it explicitly
means you can handle its omission gracefully. Remember: when consuming
GTFS-realtime data you are likely to be relying on a third-party data
provider who may or may not follow the specification correctly.
Likewise, the latitude and longitude are also required, but it is still prudent to ensure they are included. These values are treated as any floating-point numbers, so technically they may not be valid geographic coordinates.
A basic check to ensure the coordinates are valid is to ensure the latitude is between -90 and 90 and the longitude is between -180 and 180.
float latitude = position.getLatitude();
float longitude = position.getLongitude();

if (Math.abs(latitude) <= 90 && Math.abs(longitude) <= 180) {
  // Valid coordinate

}
else {
  // Invalid coordinate

}
A more advanced check would be to determine a bounding box of the data
provider’s entire public transportation network from the corresponding
GTFS feed’s stops.txt. You would then check that all received
coordinates are within or near the bounding box.
Note: The important lesson to take from this is that a GTFS-realtime feed may appear to adhere to the specification, but you should still perform your own sanity checks on received data.
In addition to the latitude and longitude, you can also retrieve a vehicle’s speed, bearing and odometer reading.
if (position.hasBearing()) {
  float bearing = position.getBearing();

  // Degrees from 0-359. 0 is North, 90 is East, 180 is South, 270 is West

}

if (position.hasOdometer()) {
  double odometer = position.getOdometer();

  // Meters
}

if (position.hasSpeed()) {
  float speed = position.getSpeed();

  // Meters per second
}
Trip Information
In order to associate a vehicle position with a particular trip from the corresponding GTFS feed, vehicle positions may include a trip descriptor.
Note: The trip descriptor is declared as optional in the GTFS-realtime specification. Realistically, it will be hard to provide value to end-users without knowing which trip the position corresponds to. At the very least, you would need to know the route (which can be specified via the trip descriptor).
Just like with service alerts (covered in the previous chapter), there are a number of values you can retrieve from a trip descriptor to determine which trip a vehicle position belongs to. The following listing demonstrates how to access this data:
if (vp.hasTrip()) {
  TripDescriptor trip = vp.getTrip();

  if (trip.hasTripId()) {
    String tripId = trip.getTripId();

  }

  if (trip.hasRouteId()) {
    String routeId = trip.getRouteId();

  }

  if (trip.hasStartDate()) {
    String startDate = trip.getStartDate();

  }

  if (trip.hasStartTime()) {
    String startTime = trip.getStartTime();

  }

  if (trip.hasScheduleRelationship()) {
    ScheduleRelationship sr = trip.getScheduleRelationship();

  }
}
Vehicle Identifiers
There are a number of values available in a vehicle position entity by which to identify a vehicle. You can access an internal identifier (not for public display), a label (such as a vehicle number painted on to a vehicle), or a license plate, as shown in the following listing:
if (vp.hasVehicle()) {
  VehicleDescriptor vehicle = vp.getVehicle();

  if (vehicle.hasId()) {
    String id = vehicle.getId();

  }

  if (vehicle.hasLabel()) {
    String label = vehicle.getLabel();

  }

  if (vehicle.hasLicensePlate()) {
    String licensePlate = vehicle.getLicensePlate();

  }
}
The vehicle descriptor and the values contained within are all optional. In the case where this information is not available, you can use the trip descriptor provided with each vehicle position to match up vehicle positions across multiple updates.
Being able to match up the trip and/or vehicle reliably over subsequent updates allows you reliably track the ongoing position changes for a particular vehicle. For instance, if you wanted to animate the vehicle moving on a map as new positions were received, you would need to know that each update corresponds to a particular vehicle.
Current Stop
Each vehicle position record can be associated with a single stop. If specified, this stop must appear in the corresponding GTFS feed.
The stop can be identified either by the stop_id value, or by using
the current_stop_sequence value. If you use the stop sequence, the
stop can be determined by finding the corresponding record in the GTFS
feed’s stop_times.txt file.
if (vp.hasStopId()) {
  String stopId = vp.getStopId();

}

if (vp.hasCurrentStopSequence()) {
  int sequence = vp.getCurrentStopSequence();

}
Note: It is possible for the same stop to be visited multiple times in a single trip (consider a loop service, although there are other instances when this may also happen). The stop sequence value can be useful to disambiguate this case.
On its own, knowing the stop has no meaning without context. The
current_status field provides this context, indicating that the
vehicle is either:
- In transit to the stop (it is the next stop but the vehicle is not yet nearby)
- About to arrive at the stop
- Currently stopped at the stop.
According to the GTFS-realtime specification, you can only make use of
current_status if the stop sequence is specified.
The following code shows how you can retrieve and check the value of the stop status.
if (vp.hasCurrentStopSequence()) {
  int sequence = vp.getCurrentStopSequence();

  if (vp.hasCurrentStatus()) {
    VehicleStopStatus status = vp.getCurrentStatus();

    switch (status.getNumber()) {
    case VehicleStopStatus.IN_TRANSIT_TO_VALUE:
      // ...

    case VehicleStopStatus.INCOMING_AT_VALUE:
      // ...

    case VehicleStopStatus.STOPPED_AT_VALUE:
      // ...

    }
  }
}
Congestion Levels
The other two values that may be included with a vehicle position relate to the congestion inside and outside of the vehicle.
The congestion_level value indicates the flow of traffic. This value does
not indicate whether or not the vehicle is running to schedule, since congestion
levels are typically accounted for in scheduling.
The following code shows how you can check the congestion level value:
if (vp.hasCongestionLevel()) {
  CongestionLevel congestion = vp.getCongestionLevel();

  switch (congestion.getNumber()) {
  case CongestionLevel.UNKNOWN_CONGESTION_LEVEL_VALUE:
    // ...

  case CongestionLevel.RUNNING_SMOOTHLY_VALUE:
    // ...

  case CongestionLevel.STOP_AND_GO_VALUE:
    // ...

  case CongestionLevel.SEVERE_CONGESTION_VALUE:
    // ...

  case CongestionLevel.CONGESTION_VALUE:
    // ...

  }
}
The occupancy_status value indicates how full the vehicle currently
is. This can be useful to present to your users so they know what to
expect before the vehicle arrives. For instance:
- A person with a broken leg may not want to travel on a standing room-only bus
- Someone traveling late at night might prefer a taxi over an empty train for safety reasons
- If a bus is full and not accepting passengers, someone may stay at home for longer until a bus with seats is coming by.
You can check the occupancy status of a vehicle as follows:
if (vp.hasOccupancyStatus()) {
  OccupancyStatus status = vp.getOccupancyStatus();

  switch (status.getNumber()) {
  case OccupancyStatus.EMPTY_VALUE:
    // ...

  case OccupancyStatus.MANY_SEATS_AVAILABLE_VALUE:
    // ...

  case OccupancyStatus.FEW_SEATS_AVAILABLE_VALUE:
    // ...

  case OccupancyStatus.STANDING_ROOM_ONLY_VALUE:
    // ...

  case OccupancyStatus.CRUSHED_STANDING_ROOM_ONLY_VALUE:
    // ...

  case OccupancyStatus.FULL_VALUE:
    // ...

  case OccupancyStatus.NOT_ACCEPTING_PASSENGERS_VALUE:
    // ...

  }
}
Determining a Vehicle’s Bearing
One of the values that can be specified in a GTFS-realtime vehicle position update is the bearing of the vehicle being reported. This value indicates either the direction the vehicle is facing, or the direction towards the next stop.
Ideally, the bearing contains the actual direction that the vehicle is facing, not the direction to the next stop, since it is possible for this value to be inaccurate. For example, if a Northbound vehicle is stopped at a stop (that is, directly beside it), then the calculated bearing would indicate the vehicle was facing East, not North.
Note: This example assumes that the vehicle is in a country that drives on the right-hand side of the road.
There are several ways to calculate a vehicle’s bearing if it is not specified in a GTFS-realtime feed:
- Determine the direction towards the next stop
- Determine the direction using a previous vehicle position reading
- A combination of the above.
Note: The GTFS-realtime specification states that feed providers should not include the bearing if it is calculated using previous positions. This is because consumers of the feed can calculate this, as shown in the remainder of this chapter.
Bearing to Next Stop
In order to determine the bearing from the current location to the next stop, there are two values you need:
- Vehicle position. This is provided in the
latitudeandlongitudefields of the vehicle position. - Position of the next stop. This is provided by the
stop_idorcurrent_stop_sequencefields of the vehicle position.
Note: Many GTFS-realtime vehicle position feeds do not include information about the next stop, and consequently this technique will not work in those instances. If this is the case, using the previous reading to determine the bearing would be used, as shown later in Bearing From Previous Position.
The following formula is used to determine the bearing between the starting location and the next stop:
θ = atan2( sin Δλ ⋅ cos φ2 , cos φ1 ⋅ sin φ2 − sin φ1 ⋅ cos φ2 ⋅ cos Δλ )
In this equation, the starting point is indicated by 1, while the next stop is represented by 2. Latitude is represented by φ, while longitude is represented by λ. For example, φ2 means the latitude of the next stop.
The resultant value θ is the bearing between the two points in radians, and must then be converted to degrees (0-360).
This equation can be represented in Java as follows. It accepts that latitude and longitude of two points in degrees, and returns the bearing in degrees.
public static double calculateBearing(double lat1Deg, double lon1Deg, double lat2Deg, double lon2Deg) {

  // Convert all degrees to radians
  double lat1 = Math.toRadians(lat1Deg);
  double lon1 = Math.toRadians(lon2Deg);
  double lat2 = Math.toRadians(lat2Deg);
  double lon2 = Math.toRadians(lon2Deg);

  // sin Δλ ⋅ cos φ2
  double y = Math.sin(lon2 - lon1) * Math.cos(lat2);

  // cos φ1 ⋅ sin φ2 − sin φ1 ⋅ cos φ2 ⋅ cos Δλ
  double x = Math.cos(lat1) * Math.sin(lat2) - Math.sin(lat1) * Math.cos(lat2) * Math.cos(lon2 - lon1);

  // Calculate the bearing in radians
  double bearingRad = Math.atan2(y, x);

  // Convert radians to degrees
  double bearingDeg = Math.toDegrees(bearingRad);

  // Ensure x is positive, in the range of 0 <= x < 360
  if (bearingDeg < 0) {
    bearingDeg += 360;
  }

  return bearingDeg;
}
One thing to be aware of when using the next stop to determine bearing
is the current_status value of the vehicle position (if specified).
If the value is STOPPED_AT, then the calculated angle might be
significantly wrong, since the vehicle is likely directly next to the
stop. In this instance, you should either use the next stop, or
determine the bearing from the previous position reading.
Bearing From Previous Position
Similar to calculating a vehicle’s bearing using the direction to the next stop, you can also use a previous reading to calculate the vehicle’s direction.
The following diagram shows two readings for the same vehicle, as well as the calculated bearing from the first point to the second.
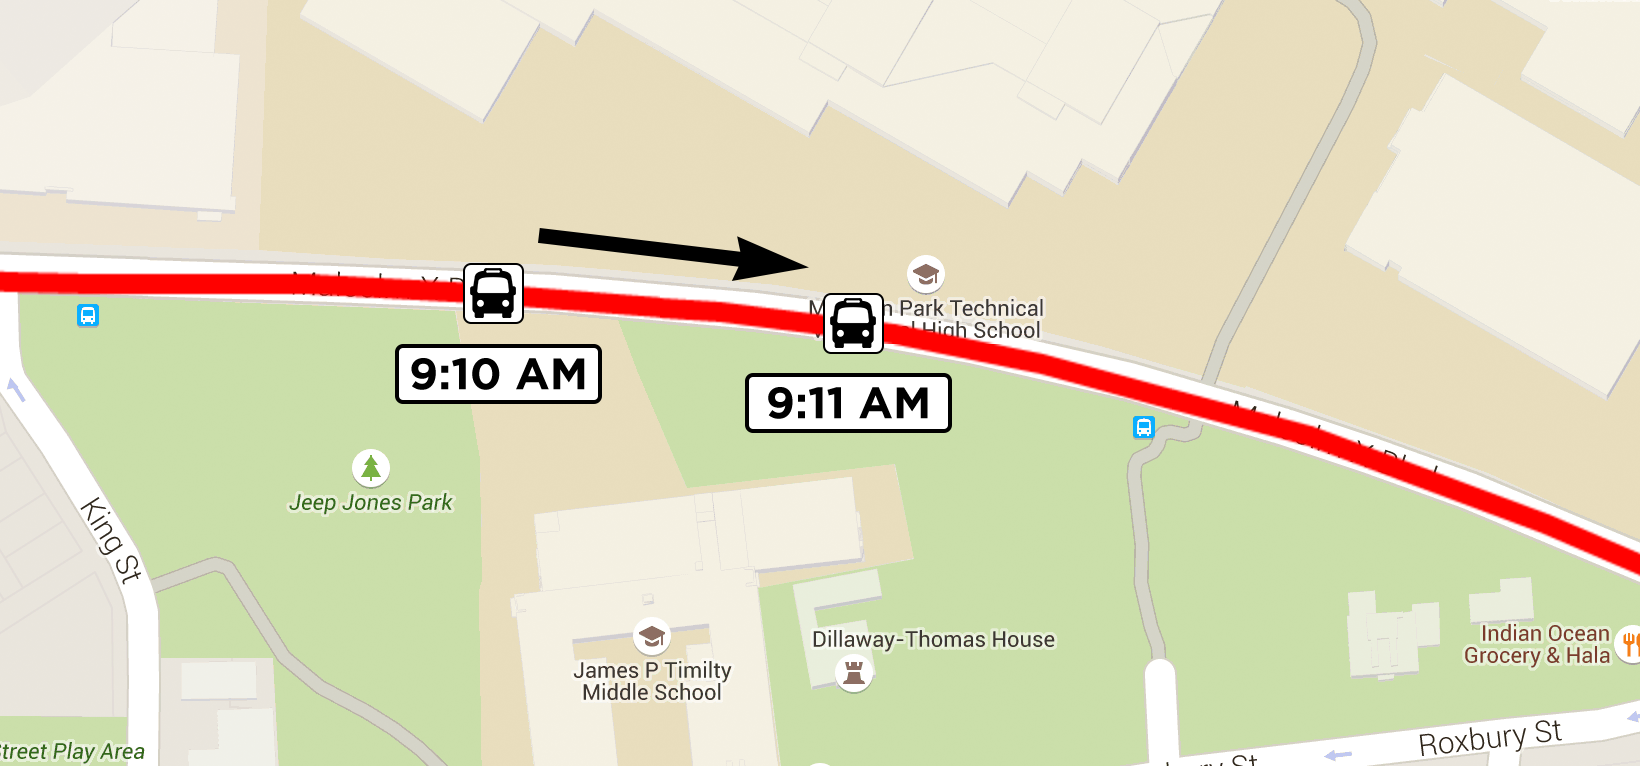
To calculate the bearing in this way, you need the following data:
- Current vehicle position. This is provided in the
latitudeandlongitudefields of the vehicle position. - Previous vehicle position. This should be the most recent vehicle position recorded prior to receiving the current vehicle position. Additionally, this position must represent a different location to the current position. If a vehicle is stationary for several minutes, you may receive several locations for the vehicle with the same coordinates.
Note: In the case of multiple readings at the same location, you should use a minimum distance threshold to decide whether or not the location is the same. For instance, you may decide that the two previous locations must be more than, say, 10 meters to use it for comparison.
It is also necessary to check the age of the previous reading. If the previous reading is more than a minute or two old, it is likely that the vehicle has travelled far enough to render the calculated bearing meaningless.
Combination
These two strategies are useful to approximate a vehicle’s bearing if it is not specified in a vehicle position message, but they are still reliant on certain data being available.
The first technique needs to know the next stop, while the second needs a previous vehicle position reading.
Your algorithm to determine a vehicle’s position could be as follows:
- Use the provided bearing value in the vehicle position if this available.
- Otherwise, if you have a recent previous reading, calculate the direction using that and the current reading.
- Otherwise, if the next stop is known, show the bearing of the vehicle towards the stop.
Consuming Trip Updates
8. Consuming Trip Updates
Of the three message types in GTFS-realtime, trip updates are the most complex. A single trip update can contain a large quantity of data and is used to transform the underlying schedule. Trips can be modified in a number of ways: trips can be canceled, stops can be skipped, and arrival times can be updated.
This chapter will show you how to consume trip updates and will discuss real-world scenarios and how they can be represented using trip updates.
Similar to service alerts and vehicle positions, you can loop over the
FeedEntity objects from getEntityList() to access and then
process TripUpdate objects.
for (FeedEntity entity : fm.getEntityList()) {
  if (entity.hasTripUpdate()) {
    TripUpdate tripUpdate = entity.getTripUpdate();

    processTripUpdate(tripUpdate);
  }
}
Timestamp
Just like with vehicle position updates, trip updates include a timestamp value. This indicates when the real-time data was updated, including any subsequent arrival/departure estimates contained within the trip update.
You can read this value into a native java.util.Date object as
follows:
if (tripUpdate.hasTimestamp()) {
  Date timestamp = new Date(tripUpdate.getTimestamp() * 1000);

}
Note: The value is multiplied by 1,000 because the java.util.Date class accepts milliseconds, whereas GTFS-realtime uses whole seconds.
Two of the ways you can use the timestamp value are:
- When telling your users arrival estimates, you can also show the timestamp so they know when the estimate was made. A newer estimate (e.g. one minute old) is likely to be more reliable than an older one (e.g. ten minutes old).
- You can also use the timestamp to decide whether or not to keep the estimate. For instance, if for some reason a feed did not refresh in a timely manner and all of the estimates were hours old, you could simply skip over them as they would no longer provide meaningful information.
Trip Information
Each trip update contains necessary data so the included estimates can be linked to a trip in the corresponding GTFS feed.
There are three ways estimate data can be provided in a trip update:
- The trip update contains estimates for all stops.
- The trip update contains estimates for some stops.
- The trip has been canceled, so there is no stop information.
If the trip has been added (that is, it is not a part of the schedule in the GTFS feed), then the trip descriptor has no use in resolving the trip back to the GTFS feed.
However, if a trip update only contains updates for some of the stops, you must be able to find the entire trip in the GTFS feed so you can propagate the arrival delay to subsequent stops.
The following code shows how to extract values such as the GTFS trip ID
and route ID from the TripDescriptor object.
if (tripUpdate.hasTrip()) {
  TripDescriptor trip = tripUpdate.getTrip();

  if (trip.hasTripId()) {
    String tripId = trip.getTripId();

    // ...
  }

  if (trip.hasRouteId()) {
    String routeId = trip.getRouteId();

    // ...
  }

  if (trip.hasStartDate()) {
    String startDate = trip.getStartDate();

    // ...
  }

  if (trip.hasStartTime()) {
    String startTime = trip.getStartTime();

    // ...
  }

  if (trip.hasScheduleRelationship()) {
    ScheduleRelationship sr = trip.getScheduleRelationship();

    // ...
  }
}
Trip Delay
Although only an experimental part of the GTFS-realtime specification at
the time of writing, a trip update can also contain a delay value. A
positive number indicates the number of seconds the vehicle is late,
while a negative value indicates the number of seconds early. A value of
0 means the vehicle is on-time.
This value can be used for any stop along the trip that does not
otherwise have an associated StopTimeEvent element.
if (tripUpdate.hasDelay()) {
  int delay = tripUpdate.getDelay();

  if (delay == 0) {
    // on time

  }
  else if (delay < 0) {
    // early

  }
  else if (delay > 0) {
    // late

  }
}
Vehicle Identifiers
The VehicleDescriptor object contained in a trip update provides a
number of values by which to identify a vehicle. You can access an
internal identifier (not for public display), a label (such as a vehicle
number painted on to a vehicle), or a license plate.
The following code shows how to access these values:
if (tripUpdate.hasVehicle()) {
  VehicleDescriptor vehicle = tripUpdate.getVehicle();

  if (vehicle.hasId()) {
    String id = vehicle.getId();

  }

  if (vehicle.hasLabel()) {
    String label = vehicle.getLabel();

  }

  if (vehicle.hasLicensePlate()) {
    String licensePlate = vehicle.getLicensePlate();

  }
}
The vehicle descriptor and the values contained within are all optional. In the case where this information is not available, you can use the trip descriptor information provided with each vehicle position to match up vehicle positions across multiple updates.
Stop Time Updates
Each trip update contains a number of stop time updates, each of which
is a StopTimeUpdate object. You can access each of the
StopTimeUpdate objects by calling getStopTimeUpdateList().
for (StopTimeUpdate stopTimeUpdate : tripUpdate.getStopTimeUpdateList()) {
  // ...
}
Alternatively, you can loop over each StopTimeUpdate object as
follows:
for (int i = 0; i < tripUpdate.getStopTimeUpdateCount(); i++) {
  StopTimeUpdate stopTimeUpdate = tripUpdate.getStopTimeUpdate(i);

  // ...
}
Each StopTimeUpdate object contains a schedule relationship value
(using the ScheduleRelationship class, which is different to that
contained in TripDescriptor objects).
The schedule relationship dictates how to use the rest of the data in
the stop time update, as well as which data will be present. If the
schedule relationship value is not present, the value is assumed to be
SCHEDULED.
ScheduleRelationship sr;

if (stopTimeUpdate.hasScheduleRelationship()) {
  sr = stopTimeUpdate.getScheduleRelationship();

}
else {
  sr = ScheduleRelationship.SCHEDULED;

}

if (sr.getNumber() == ScheduleRelationship.SCHEDULED_VALUE) {
  // An arrival and/or departure estimate is provided

}
else if (sr.getNumber() == ScheduleRelationship.NO_DATA_VALUE) {
  // No real-time data available in this update

}
else if (sr.getNumber() == ScheduleRelationship.SKIPPED_VALUE) {
  // The vehicle will not stop at this stop

}
Stop Information
In order to determine which stop a stop time update corresponds to,
either the stop ID or stop sequence (or both) must be specified. You can
then look up the stop based on its entry in stops.txt, or determine
the stop based on the corresponding entry in stop_times.txt.
if (stopTimeUpdate.hasStopId()) {
  String stopId = stopTimeUpdate.getStopId();

}

if (stopTimeUpdate.hasStopSequence()) {
  int sequence = stopTimeUpdate.getStopSequence();

}
Arrival/Departure Estimates
If the ScheduleRelationship value is SKIPPED there must either
be an arrival or departure object specified. Both the arrival and
departure use the StopTimeEvent class, which can be accessed as
follows.
The following code shows how to access these values:
if (sr.getNumber() == ScheduleRelationship.SCHEDULED_VALUE) {
  if (stopTimeUpdate.hasArrival()) {
    StopTimeEvent arrival = stopTimeUpdate.getArrival();

    // Process the arrival
  }

  if (stopTimeUpdate.hasDeparture()) {
    StopTimeEvent departure = stopTimeUpdate.getDeparture();

    // Process the departure
  }
}
Each StopTimeEvent object contains either an absolute timestamp for
the arrival or departure, or it contains a delay value. The delay value
is relative to the scheduled time in the corresponding GTFS feed.
if (stopTimeUpdate.hasArrival()) {
  StopTimeEvent arrival = stopTimeUpdate.getArrival();

  if (arrival.hasDelay()) {
    int delay = arrival.getDelay();

    // ...
  }

  if (arrival.hasTime()) {
    Date time = new Date(arrival.getTime() * 1000);

    // ...
  }

  if (arrival.hasUncertainty()) {
    int uncertainty = arrival.getUncertainty();

    // ...
  }
}
Trip Update Scenarios
This chapter has shown you how to handle trip update information as it appears in a GTFS-realtime feed. It is also important to understand the intent of the data provider when reading these updates. Consider the following scenarios that can occur frequently in large cities:
- A train needs to skip one or more stops. Perhaps the station has been closed temporarily due to unforeseen circumstances.
- A train that was scheduled to bypass a station will now stop at it. Perhaps there is a temporary delay on the line so the train will wait at a stop while the track is cleared.
- A bus is rerouted down a different street. Perhaps there was a car accident earlier and police have redirected traffic.
- A train will stop at a different platform. For example, instead of a train stopping at platform 5 at a given station, it will now stop at platform 6. This happens frequently on large train networks such as in Sydney.
- A bus trip is completely canceled. Perhaps the bus has broken down and there is no replacement vehicle.
- An unplanned trip is added. Perhaps there is an unexpectedly large number of passengers so extra buses are brought in to clear the backlog.
While each provider may represent these scenarios differently in GTFS-realtime, it is likely each of them would be represented as follows.
-
Modify the existing trip. Include a
StopTimeUpdatefor each stop that is to be canceled with aScheduleRelationshipvalue ofSKIPPED. -
Cancel the trip and add a new one. Unfortunately, there is no way in GTFS-realtime to insert a stop into an existing trip. The
ScheduleRelationshipvalue for the trip would be set toCANCELED(in theTripDescriptor, not in theStopTimeUpdateelements). -
If a bus is rerouted down a different street, how it is handled depends on which stops are missed:
- If no stops are to be made on the new street, cancel the stops impacted by the detour, similar to scenario 1.
- If the bus will stop on the new street to drop passengers off or pick them up, then cancel the trip and add a new one, similar to scenario 2.
-
Cancel the trip and add a new one. Since it is not possible to insert a stop using GTFS-realtime, the existing trip must be canceled and a new trip added to replace it if you want the platform to be reflected accurately. Note, however, that many data providers do not differentiate between platforms in their feeds, so they only refer to the parent station instead. In this instance a platform change should be communicated using service alerts if it could otherwise cause confusion.
-
Cancel the trip. In this instance you would not need to include any
StopTimeUpdateelements for the trip; rather, you would specifyCANCELEDin theScheduleRelationshipfield ofTripDescriptor. -
Add a new trip. When adding a new trip, all of the stops in the trip should also be included (not just the next one). The
ScheduleRelationshipfor the trip would be set toADDED.
The important takeaway from this section is that if you are telling your users that a trip has been canceled, you need to make it clear to them if a new trip has replaced it, otherwise they may not correctly understand the intent of the data.
In these instances, hopefully the data provider also provides a corresponding service alert so the reason for the change can be communicated to passengers.
Database Storage
9. Storing Feed Data in a Database
This chapter will demonstrate how to save data from a GTFS-realtime feed into an SQLite database. In order to look up trips, stops, routes and other data from the GTFS-realtime feed, this SQLite database will also contain the data from the corresponding GTFS feed.
To do this, the GtfsToSql and GtfsRealTimeToSql tools which have
been written for the purpose of this book and the preceding book, The
Definitive Guide to GTFS (http://gtfsbook.com),
will be used.
GTFS and GTFS-realtime feeds from the MBTA in Boston (https://openmobilitydata.org/p/mbta) will also be used.
Storing GTFS Data in an SQLite Database
The Definitive Guide to GTFS demonstrated how to populate an SQLite
database using GtfsToSql. Here is an abbreviated version of the
steps required to do so.
First, download GtfsToSql from
https://github.com/OpenMobilityData/GtfsToSql. This is a Java command-line
application to import a GTFS feed into an SQLite database.
The pre-compiled GtfsToSql Java archive can be downloaded from its
GitHub repository at
https://github.com/OpenMobilityData/GtfsToSql/tree/master/dist.
Next, download the MBTA GTFS feed, available from http://www.mbta.com/uploadedfiles/MBTA_GTFS.zip.
$ curl http://www.mbta.com/uploadedfiles/MBTA_GTFS.zip -o gtfs.zip

$ unzip gtfs.zip -d mbta/
To create an SQLite database from this feed, the following command can be used:
$ java -jar GtfsToSql.jar -s jdbc:sqlite:./db.sqlite -g ./mbta -o
Note: The -o flag enables the recording of additional useful data in
the database. For instance, each entry in the trips table will contain
the departure and arrival time (which would otherwise only be available
by looking up the stop_times table).
This may take a minute or two to complete (you will see progress as it
imports the feed and then creates indexes), and at the end you will have
a GTFS database in a file called db.sqlite. You can then query this
database with the command-line sqlite3 tool, as shown in the
following example:
$ sqlite3 db.sqlite

sqlite> SELECT agency_id, agency_name, agency_url, agency_lang FROM agency;

2|Massport|http://www.massport.com|EN

1|MBTA|[http://www.mbta.com](http://www.mbta.com/)|EN
Note: For more information about storing and querying GTFS data, please refer to The Definitive Guide to GTFS, available from http://gtfsbook.com.
Storing GTFS-realtime Data in an SQLite Database
Once the GTFS data has been imported into the SQLite database, you can
then start importing GTFS-realtime data. For this you can use the
GtfsRealTimeToSql tool specifically written to import data into an
SQLite database.
Note: Technically you do not need the GTFS data present in the database as well, but having it makes it far simpler to resolve trip, route and stop data.
The GTFS data will change infrequently (perhaps every few weeks or
months), while the realtime data can change several times per minute.
GtfsRealTimeToSql will frequently update a feed, according to the
refresh time specified. Each time it updates, the data saved on the
previous iteration is deleted, as that data is no longer the most
up-to-date data.
To get started, download GtfsRealTimeToSql from its GitHub
repository at https://github.com/OpenMobilityData/GtfsRealTimeToSql. Just
like GtfsToSql, this is a Java command-line application. The
pre-compiled GtfsRealTimeToSql Java archive can be downloaded from
https://github.com/OpenMobilityData/GtfsRealTimeToSql/tree/master/dist.
Since the db.sqlite database contains the MBTA GTFS feed, you can
now run GtfsRealTimeToSql with one of MBTA’s GTFS-realtime feeds.
For instance, their vehicle positions feed is located at
http://developer.mbta.com/lib/gtrtfs/Vehicles.pb.
java -jar GtfsRealTimeToSql.jar \
  -u "http://developer.mbta.com/lib/gtrtfs/Vehicles.pb" \
  -s jdbc:sqlite:./db.sqlite \
  -refresh 15
When you run this command, the vehicle positions feed will be retrieved
every 15 seconds (specified by the -refresh parameter), and the data
will be saved into the db.sqlite SQLite database.
MBTA also have a trip updates feed and a service alerts feed. In order
to load each of these feeds you will need to run GtfsRealTimeToSql
three separate times. To allow it to run in the background, add the
-d parameter (to make it run as a server daemon), and background it
using &.
To load the vehicle positions in the background, stop the previous command, then run the following command instead.
java -jar GtfsRealTimeToSql.jar \
  -u "http://developer.mbta.com/lib/gtrtfs/Vehicles.pb" \
  -s jdbc:sqlite:./db.sqlite \
  -refresh 15 \
  -d &
Now you can also load the trip updates into the same db.sqlite file.
MBTA’s trip updates feed is located at
http://developer.mbta.com/lib/gtrtfs/Passages.pb. The following
command reloads the trip updates every 30 seconds:
java -jar GtfsRealTimeToSql.jar \
  -u "http://developer.mbta.com/lib/gtrtfs/Passages.pb" \
  -s jdbc:sqlite:./db.sqlite \
  -refresh 30 \
  -d &
Note: You may prefer more frequent updates (such as 15 seconds), or even less frequent (such as 60 seconds). The more frequently you update, the greater your server utilization will be.
Finally, to load the service alerts feed, use the same command, but now with the feed located at http://developer.mbta.com/lib/GTRTFS/Alerts/Alerts.pb. Generally, service alerts are updated infrequently by providers, so you can use a refresh time such as five or ten minutes (300 or 600 seconds).
java -jar GtfsRealTimeToSql.jar \
  -u "http://developer.mbta.com/lib/gtrtfs/Alerts/Alerts.pb" \
  -s jdbc:sqlite:./db.sqlite \
  -refresh 300 \
  -d &
These three feeds will continue to be reloaded until you terminate their respective processes.
Querying Vehicle Positions
When using GtfsRealTimeToSql, vehicle positions are stored in a
table called gtfs_rt_vehicles. If you want to retrieve positions
for, say, the route with an ID of 742, you can run the following query:
$ sqlite3 db.sqlite

sqlite> SELECT route_id, trip_id, trip_date, trip_time, trip_sr, latitude, longitude
  FROM gtfs_rt_vehicles
  WHERE route_id = 742;
This query returns the trip descriptor and GPS coordinates for all vehicles on the given route. The following table shows sample results from this query.
route_id | trip_id | trip_date | trip_time | trip_sr | latitude | longitude |
|---|---|---|---|---|---|---|
| 742 | 25900860 | 20150315 | 0 | 42.347309 | -71.040359 | |
| 742 | 42.331505 | -71.065590 |
Note: The trip_sr column corresponds to the trip’s schedule relationship value.
This particular snapshot of vehicle position data shows two different trips for route 742, which corresponds to the SL2 Silver Line.
sqlite> SELECT route_short_name, route_long_name FROM routes WHERE
route_id = 742;

SL2|Silver Line SL2
The first five columns retrieved are the trip identifier fields, which
are used to link a vehicle position with a trip from the GTFS feed. The
first row is simple: the trip_id value can be used to look up the
row from the trips table.
sqlite> SELECT service_id, trip_headsign, direction_id, block_id

FROM trips

WHERE trip_id = '25900860';
The results from this query are as follows.
service_id | trip_headsign | direction_id | block_id |
|---|---|---|---|
| BUSS12015-hbs15017-Sunday-02 | South Station | 1 | S742-61 |
Note: To see all fields available in this or any other table
(including gtfs_rt_vehicles), use the .schema command in SQLite. For
instance, enter the command .schema gtfs_rt_vehicles.
One helpful thing MBTA does is to include the trip starting date when they include the trip ID. This helps to disambiguate trips that may start or finish around midnight or later.
The second vehicle position is another matter. This record does not include any trip descriptor information other than the route ID. This means you cannot reliably link this vehicle position with a specific trip from the GTFS feed.
However, knowing the route ID and the vehicle’s coordinates may be enough to present useful information to the user: “A bus on the Silver Line SL2 route is at this location.” You cannot show them if the vehicle is running late, early or on-time, but you can show the user where the vehicle is.
Querying Trip Updates
The GtfsRealTimeToSql tool stores trip update data in two tables:
one for the main trip update data (such as the trip descriptor), and
another to store each individual stop time event that belongs within
each update.
For example, to retrieve all trip updates for the route with ID 742 once again, you could use the following query:
SELECT route_id, trip_id, trip_date, trip_time, trip_sr, vehicle_id, vehicle_label
  FROM gtfs_rt_trip_updates
  WHERE route_id = '742';
This query will return data similar to the following table:
route_id | trip_id | trip_date | trip_time | trip_sr | vehicle_id | vehicle_label |
|---|---|---|---|---|---|---|
| 742 | 25900860 | 20150315 | 0 | y1106 | 1106 | |
| 742 | 25900856 | 20150315 | 0 | |||
| 742 | 25900858 | 20150315 | 0 |
Each of these returned records has corresponding records in the
gtfs_rt_trip_updates_stoptimes table that includes the
arrival/departure estimates for various stops on the trip.
When using GtfsRealTimeToSql, an extra column called update_id
is included on both tables so they can be linked together. For example,
to retrieve all updates for the route ID 742, you can join the tables
together as follows:
SELECT trip_id, arrival_time, arrival_delay, departure_time, departure_delay, stop_id, stop_sequence
  FROM gtfs_rt_trip_updates_stoptimes
  JOIN gtfs_rt_trip_updates USING (update_id)
  WHERE route_id = '742';
MBTA’s trip updates feed only includes a stop time prediction for the next stop. This means that each trip in the results only has one corresponding record. You must then apply the delay to subsequent stop times for the given trip.
trip_id | arrival_time | arrival_delay | departure_time | departure_delay | stop_id | stop_sequence |
|---|---|---|---|---|---|---|
| 25900860 | 30 | 74617 | 10 | |||
| 25900856 | 0 | 74611 | 1 | |||
| 25900858 | 0 | 31255 | 1 |
There are several things to note in these results. Firstly, MBTA do not
provide a timestamp for arrival_time and departure_time; they
only provide the delay offsets that can be compared to the scheduled
time in the GTFS feed.
Secondly, the second and third trips listed have not yet commenced. You
can deduce this just by looking at this table, since the next stop has
stop sequence of 1 (and therefore there are no stops before it).
The first trip is delayed by 30 seconds. In other words, it will arrive 30 seconds later than it was scheduled. The data received from the GTFS-realtime feed does not actually indicate the arrival timestamp, but you can look up the corresponding stop time from the GTFS feed to determine this.
The following query demonstrates how to look up the arrival time:
SELECT s.stop_name, st.arrival_time
  FROM stop_times st, trips t, stops s
  WHERE st.trip_index = t.trip_index
  AND st.stop_index = s.stop_index
  AND s.stop_id = '74617'
  AND t.trip_id = '25900860'
  AND st.stop_sequence = 10;
Note: The GtfsToSql tool used to import the GTFS feed adds fields
such as trip_index and stop_index in order to speed up data searching.
There is more discussion on the rationale of this in The Definitive
Guide to GTFS, available from
http://gtfsbook.com.
This query joins the stop_times table to both the trips and
stops table in order to look up the corresponding arrival time. The
final three rows in the query contain the values returned above (the
stop_id, trip_id and the stop_sequence), to find the
following record:
South Station Silver Line - Inbound|21:17:00
This means the scheduled arrival time for South Station Silver Line is 9:17:00 PM. Since the estimate indicates a delay of 30 seconds, the new arrival time is 9:17:30 PM.
Note: Conversely, if the delay was -30 instead of 30, the vehicle would be early and arrive at 9:16:30 PM.
One thing not touched upon in this example is the stop time’s schedule
relationship. The gtfs_rt_trip_updates_stoptimes also includes a
column called rship, which is used to indicate the schedule
relationship for the given stop. If this value was skipped (a value of
1), then it means the vehicle will stop here.
Determining Predictions Using Blocks
In GTFS, the block_id value in trips.txt is used to indicate a
series of one or more trips undertaken by a single vehicle. In other
words, once it gets to the end of one trip, it starts a new trip from
that location. If a given trip is very short, a vehicle may perform up
to fifty or one hundred trips in a single day.
This can be useful for determining estimates for future trips that may not be included in the GTFS feed. For instance, if a trip is running 30 minutes late, then it is highly likely that subsequent trips on that block will also be running late.
Referring back to the trip data returned in the above example, the following data can be retrieved from the GTFS feed:
SELECT trip_id, block_id, service_id, departure_time, arrival_time
  FROM trips
  WHERE trip_id IN ('25900860', '25900856', '25900858')
  ORDER BY departure_time;
This returns the following data.
trip_id | block_id | service_id | departure_time | arrival_time |
|---|---|---|---|---|
| 25900860 | S742-61 | BUSS12015-hbs15017-Sunday-02 | 21:04:00 | 21:17:00 |
| 25900856 | S742-61 | BUSS12015-hbs15017-Sunday-02 | 21:18:00 | 21:28:00 |
| 25900858 | S742-61 | BUSS12015-hbs15017-Sunday-02 | 21:35:00 | 21:48:00 |
Each of these trips have the same values for block_id and
service_id, meaning the same vehicle will complete all three trips.
The data indicates that the first trip is running 30 seconds late, so
its arrival time will be 21:17:30.
Because the second trip is scheduled to depart at 21:18:00, there is a buffer time to catch up (in other words, the first trip is only 30 seconds late, so hopefully it will not impact the second trip).
If, for instance, the second trip ran 10 minutes late (and therefore arrived at 21:38:00 instead of 21:28:00), you could reasonably assume the third trip would begin at about 21:38:00 instead of 21:35:00 (about three minutes late).
Querying Service Alerts
When using GtfsRealTimeToSql to store service alerts, data is stored
in three tables. The main service alert information is stored in
gtfs_rt_alerts. Since there can be any number of time ranges or
affected entities for any given alert, there is a table to hold time
ranges (gtfs_rt_alerts_timeranges) and one to hold affected entities
(gtfs_rt_alerts_entities).
In order to link this data together, each alert has an alert_id
value (created by GtfsRealTimeToSql) which is also present for any
corresponding time range and affected entities records.
To retrieve service alerts from the database, you can use the following query:
SELECT alert_id, header, description, cause, effect FROM gtfs_rt_alerts;
At the time of writing, this yields the following results. The description has been shortened as they are quite long and descriptive in the original feed.
alert_id | header | description | cause | effect |
|---|---|---|---|---|
| 6 | Route 11 detour | Route 11 outbound detoured due to … | 1 | 4 |
| 11 | Ruggles elevator unavailable | … Commuter Rail platform to the lobby is unavailable … | 9 | 7 |
| 33 | Extra Franklin Line service | 1 | 5 |
**Note: **A cause value of 1 corresponds to UNKNOWN_CAUSE, while 9 corresponds to MAINTENANCE. An effect value of 4 corresponds to DETOUR, 7 corresponds to OTHER_EFFECT, while 5 corresponds to ADDITIONAL_SERVICE.
To determine the timing of these alerts, look up the
gtfs_rt_alerts_timeranges for the given alerts.
$ export TZ=America/New_York

$ sqlite3 db.sqlite

sqlite> SELECT alert_id, datetime(start, 'unixepoch', 'localtime'), datetime(finish, 'unixepoch', 'localtime')
  FROM gtfs_rt_alerts_timeranges
  WHERE alert_id IN (6, 11, 33);
Note: In this example, the system timezone has been temporarily changed to America/New_York (the timezone specified in MBTA’s agency.txt file) so the timestamps are formatted correctly. You may prefer instead to format the start and finish timestamps using your programming language of choice.
alert_id | start (formatted) | finish (formatted) |
|---|---|---|
| 6 | 2015-02-17 15:56:52 | |
| 11 | 2015-03-18 06:00:00 | 2015-03-18 16:00:00 |
| 11 | 2015-03-19 06:00:00 | 2015-03-19 16:00:00 |
| 33 | 2015-03-16 10:58:38 | 2015-03-18 02:30:00 |
These dates indicate the following:
- The alert with an ID of 6 began on February 17 and has no specified end date.
- The alert with an ID of 11 will occur over two days between 6 AM and 4 PM. *The alert with an ID of 33 will last for almost two days.
Finally, to determine which entities (routes, trips, stops) are affected
by these alerts, query the gtfs_rt_alerts_entities table.
SELECT alert_id, agency_id, route_id, route_type, stop_id, trip_id, trip_start_date, trip_start_time, trip_rship
  FROM gtfs_rt_alerts_entities WHERE alert_id IN (6, 11, 33);
This results in the following data, describing only an entity for the final service alert.
alert_id | agency_id | route_id | route_type | stop_id | trip_id | trip_start_date | trip_start_time | trip_rship |
|---|---|---|---|---|---|---|---|---|
| 6 | 1 | CR-Franklin | 2 |
Using the route_id value, you can find the route from the GTFS feed:
SELECT agency_id, route_type, route_long_name, route_desc
  FROM routes WHERE route_id = 'CR-Franklin';
This query will result in the following data:
agency_id | route_type | route_long_name | route_desc |
|---|---|---|---|
| 1 | 2 | Franklin Line | Commuter Rail |
In effect, this means that if you have a web site or app displaying the schedule for the Franklin line, this alert should be displayed so the people who use the line are aware of the change.
Note: Even though the agency_id and route_type values are included,
you do not really need these since the route_id can only refer to one
row in the GTFS feed. If instead you wanted to refer to ALL rail lines,
the alert would have the route_id value blank but keep the route_type
value.
Extensions
10. GTFS-realtime Extensions
Introduction to gtfs-realtime.proto showed you an extract
from the gtfs-realtime.proto file that is used as an input to the
Protocol Buffers protoc command.
One of the lines in this extract included the following extensions
directive:
extensions 1000 to 1999;
Each element in a Protocol Buffers entity must be assigned a value. This
is the value used to represent the element in the binary protocol buffer
stream (for instance, the trip element was assigned a value of
1). The extensions directive reserves the values between 1000
and 1999 for external use.
Having these values reserved means that transit agencies are free to
include additional information in their own GTFS-realtime feeds. In this
instance, the agency provides its own proto file to use with
protoc that builds on the original gtfs-realtime.proto file.
At the time of writing, the following extensions are defined:
| Extension ID | Developer |
|---|---|
| 1000 | OneBusAway |
| 1001 | New York City MTA |
| 1002 | |
| 1003 | OVapi |
| 1004 | Metra |
You can find this list at https://developers.google.com/transit/gtfs-realtime/changes). As more agencies release GTFS-realtime feeds this list will grow, since many agencies have specific requirements in the way their internal systems work, as well as to facilitate providing data in a way that is understood by users of the given transport system.
To demonstrate how extensions are specified and used, the following case study will show you the extension for the New York City subway system.
Case Study: New York City Subway
One of the agencies that provides an extension is New York City MTA. They add a number of custom fields to their subway GTFS-realtime feeds.
The following is a slimmed-down version of their Protocol Buffers definition file, available from http://datamine.mta.info/sites/all/files/pdfs/nyct-subway.proto.txt.
option java_package = "com.google.transit.realtime";

import "gtfs-realtime.proto";

message TripReplacementPeriod {
  optional string route_id = 1;
  optional transit_realtime.TimeRange replacement_period = 2;
}

message NyctFeedHeader {
  required string nyct_subway_version = 1;
  repeated TripReplacementPeriod trip_replacement_period = 2;
}

extend transit_realtime.FeedHeader {
  optional NyctFeedHeader nyct_feed_header = 1001;
}

message NyctTripDescriptor {
  optional string train_id = 1;
  optional bool is_assigned = 2;

  enum Direction {
    NORTH = 1;
    EAST = 2;
    SOUTH = 3;
    WEST = 4;
  }

  optional Direction direction = 3;
}

extend transit_realtime.TripDescriptor {
  optional NyctTripDescriptor nyct_trip_descriptor = 1001;
}

// NYCT Subway extensions for the stop time update

message NyctStopTimeUpdate {
  optional string scheduled_track = 1;
  optional string actual_track = 2;
}

extend transit_realtime.TripUpdate.StopTimeUpdate {
  optional NyctStopTimeUpdate nyct_stop_time_update = 1001;
}
This file begins by importing the original gtfs-realtime.proto file
that was examined in Introduction to gtfs-realtime.proto.
It then defines a number of new element types (they choose to prefix
them using Nyct, although the only important thing here is that they
don’t conflict with the names from gtfs-realtime.proto).
This definition file then extends the TripDescriptor and
StopTimeUpdate element types. Values
1000 to 1999 are reserved for custom extensions. This is the
reason why the added nyct_trip_descriptor and
nyct_stop_time_update fields use numbers in this range.
Compiling an Extended Protocol Buffer
In order to make use of these extended fields, you first need to
download and compile the nyct-subway.proto file into the same
directory as gtfs-realtime.proto (Compiling gtfs-realtime.proto).
$ cd /path/to/protobuf

$ curl \
  http://datamine.mta.info/sites/all/files/pdfs/nyct-subway.proto.txt \
  -o nyct-subway.proto
You can now build a Java class similar to before, but using the
nyct-subway.proto file as the input instead of
gtfs-realtime.proto:
$ protoc \
  --proto_path=/path/to/protobuf \
  --java_out=/path/to/gtfsrt/src \
  /path/to/protobuf/nyct-subway.proto
If this command executes successfully, you will now have a file called
NyctSubway.java in the ./src/com/google/transit/realtime
directory (in addition to GtfsRealtime.java, which is still
required).
The next section will show you how to use this class.
Registering Extensions
The process to load an extended GTFS-realtime is the same as a regular
feed (in that you call parseFrom() to build the FeedMessage
object), but first you must register the extensions.
In Java, this is achieved using the ExtensionRegistry class and the
registerAllExtensions() helper method.
import com.google.protobuf.ExtensionRegistry;

...

ExtensionRegistry registry = ExtensionRegistry.newInstance();

NyctSubway.registerAllExtensions(registry);
The ExtensionRegistry object is then passed to parseFrom() as
the second argument. The following code shows how to open and read the
main New York City subway feed.
Note: A developer API key is required to access the MTA GTFS-realtime feeds. You can register for a key at http://datamine.mta.info, then substitute it into the key variable.
public class YourClass {
  public void loadFeed() throws IOException {

    String key = "*YOUR_KEY*";

    URL url = new URL("http://datamine.mta.info/mta_esi.php?feed_id=1&key=" + key);

    InputStream is = url.openStream();

    ExtensionRegistry registry = ExtensionRegistry.newInstance();

    NyctSubway.registerAllExtensions(registry);

    FeedMessage fm = FeedMessage.parseFrom(is, registry);

    is.close();

    // ...

  }
}
Once the feed has been parsed, you will no longer need to pass the extension registry around.
Accessing Extended Protocol Buffer Elements
Earlier it was explained that the general paradigm with reading
GTFS-realtime data is to check the existence of a field using
hasFieldName(), and to retrieve the value using
getFieldName().
This also applies to retrieving extended elements, but instead of there
being built-in methods for each extended field type, use
hasExtension(fieldName) and getExtension(fieldName).
The argument passed to hasExtension() and getExtension() is a
unique identifier for that field. The identifier is a static property of
the NyctSubway class. For example, the nyct_trip_descriptor
extended field has a unique identifier of
NyctSubway.nyctTripDescriptor.
Since this field is an extension to the standard TripDescriptor
field, you can check for its presence as follows:
TripUpdate tripUpdate = entity.getTripUpdate();

TripDescriptor td = tripUpdate.getTrip();

if (td.hasExtension(NyctSubway.nyctTripDescriptor)) {
  // ...
}
The NyctSubway.nyctTripDescriptor identifier corresponds to a field
of the created class NyctTripDesciptor, meaning that you can
retrieve its value and assign it directly to the class type.
NyctTripDescriptor nyctTd = td.getExtension(NyctSubway.nyctTripDescriptor);
You can now access the values directly from this instance of
NyctTripDescriptor. For example, one of the added fields is
direction, which indicates whether the general direction of the train is
North, South, East or West. The following code shows how to use this
value:
if (nyctTd.hasDirection()) {
  Direction direction = nyctTd.getDirection();

  switch (direction.getNumber()) {
  case Direction.NORTH_VALUE: // Northbound train
    break;

  case Direction.SOUTH_VALUE: // Southbound train
    break;

  case Direction.EAST_VALUE: // Eastbound train
    break;

  case Direction.WEST_VALUE: // Westbound train
    break;

  }
}
Similarly, you can access other extended fields, either from the
NyctTripDescriptor object, or from an instance of the
NyctStopTimeUpdate extension.
GTFS-realtime Extension Complete Example
Piecing together the snippets from this case study, the following code shows in context how you can access the extra fields such as the train’s direction and identifier:
public class NyctProcessor {

  // Loads and processes the feed
  public void process(String apiKey) throws IOException {

    URL url = new URL("http://datamine.mta.info/mta_esi.php?feed_id=1&key=" + apiKey);

    InputStream is = url.openStream();

    // Register the NYC-specific extensions

    ExtensionRegistry registry = ExtensionRegistry.newInstance();

    NyctSubway.registerAllExtensions(registry);

    FeedMessage fm = FeedMessage.parseFrom(is, registry);

    // Loop over all entities

    for (FeedEntity entity : fm.getEntityList()) {
      // In this example only trip updates are processed

      if (entity.hasTripUpdate()) {
        processTripUpdate(entity.getTripUpdate());
      }
    }
  }

  // Used to process a single trip update
  public void processTripUpdate(TripUpdate tripUpdate) {

    if (tripUpdate.hasTrip()) {

      TripDescriptor td = tripUpdate.getTrip();

      // Check if the extended trip descriptor is available

      if (td.hasExtension(NyctSubway.nyctTripDescriptor)) {
        NyctTripDescriptor nyctTd = td.getExtension(NyctSubway.nyctTripDescriptor);

        processNyctTripDescriptor(nyctTd);
      }
    }
  }

  // Process a single extended trip descriptor
  public void processNyctTripDescriptor(NyctTripDescriptor nyctTd) {

    // If the train ID is specified, output it
    if (nyctTd.hasTrainId()) {
      String trainId = nyctTd.getTrainId();

      System.out.println("Train ID: " + trainId);
    }

    // If the direction is specified, output it

    if (nyctTd.hasDirection()) {
      Direction direction = nyctTd.getDirection();

      String directionLabel = null;

      switch (direction.getNumber()) {
      case Direction.NORTH_VALUE:
        directionLabel = "North";
        break;

      case Direction.SOUTH_VALUE:
        directionLabel = "South";
        break;

      case Direction.EAST_VALUE:
        directionLabel = "East";
        break;

      case Direction.WEST_VALUE:
        directionLabel = "West";
        break;

      default:
        directionLabel = "Unknown Value";
      }

      System.out.println("Direction: " + directionLabel);
    }
  }
}
After you invoke the process() method, your output should be similar
to the following:
Direction: North

Train ID: 06 0139+ PEL/BBR
Publishing Feeds
11. Publishing GTFS-realtime Feeds
So far this book has been focused on how to consume GTFS-realtime feeds; in this chapter you will be shown how to create and publish your own GTFS-realtime feeds.
While this chapter is primarily intended for transit agencies (or third-party companies providing services to public transit companies), this information can be useful in other situations also.
Even if you do not represent a transit agency or have access to the GPS units of an entire bus fleet, there may still be situations where you want to produce a GTFS feed. For example, if you have a trip planning server that can only handle GTFS and GTFS-realtime data, you might build your own GTFS-realtime feeds in the following situations:
- A transit company offers service alerts only via Twitter or an RSS feed.
- You can access vehicle positions or estimated arrivals from a feed in a format such as SIRI, NextBus or BusTime.
- You have interpolated your own vehicle positions based on GTFS-realtime trip updates.
- You have interpolated your own trip updates based on vehicle positions.
Building Protocol Buffer Elements
When you generate source files using the protoc command, there is a
builder class created for each element type. To create an element to
include in a protocol buffer, you use its builder to construct the
element.
For example, a service alert entity uses the Alert class. To
construct your own service alert, you would use the Alert.Builder
class. The Alert class contains a static method called
newBuilder() to create an instance of Alert.Builder.
Alert.Builder alert = Alert.newBuilder();
You can now set the various elements that describe a service alert.
alert.setCause(Cause.ACCIDENT);

alert.setEffect(Effect.DETOUR);
Most elements will be more complex than this; you will need to build
them in a similar manner before adding them to the alert. For example,
the header text for a service alert uses the TranslatedString
element type, which contains one or more translations of a single
string.
Translation.Builder translation = Translation.newBuilder();

translation.setText("Car accident");

TranslatedString.Builder translatedString = TranslatedString.newBuilder();

translatedString.addTranslation(translation);

alert.setHeaderText(translatedString);
In actual fact, you can chain together these calls, since the builder methods return the builder. The first two lines of the above code can be shortened as follows:
Translation.Builder translation = Translation.newBuilder().setText("Car accident");
For repeating elements (such as the informed_entity field), use the
addElementName() method. In the case of informed_entity,
this would be addInformedEntity(). The following code adds an
informed entity to the alert for a route with an ID of 102:
EntitySelector.Builder entity = EntitySelector.newBuilder().setRouteId("102");

alert.addInformedEntity(entity);
Creating a Complete Protocol Buffer
The previous section showed the basics of creating a service alert message, but a protocol buffer feed has more to it than just a single entity. It can have multiple entities, and you must also include the GTFS-realtime header. The header can be created as follows:
FeedHeader.Builder header = FeedHeader.newBuilder();

header.setGtfsRealtimeVersion("1.0");
A single service alert (or a trip update, or a vehicle position) is
contained within a FeedEntity object. Each FeedEntity in a feed
must have a unique ID. The following code creates the FeedEntity
using the alert object created in the previous section.
FeedEntity.Builder entity = FeedEntity.newBuilder();

entity.setId("SOME UNIQUE ID");

entity.setAlert(alert);
Once you have the header and an entity you can create the feed as follows:
FeedMessage.Builder message = FeedMessage.newBuilder();

message.setHeader(header);

message.addEntity(entity);
Note: A feed with no entities is also valid; in the middle of the night there may be no vehicle positions or trip updates, and there may frequently be no service alerts.
Once you have created this object, you can turn it into a
FeedMessage by calling build().
FeedMessage feed = message.build();
This will give you a FeedMessage object just like when you parse a
third-party feed using FeedMessage.parseFrom().
Full Source Code
Piecing together all of the code covered so far in this chapter, you could create a service alert feed (using a fictional detour) using the following code.
This example makes use of a helper method to build translated strings, since it needs to be done a number of times. If you want to create the alert in multiple languages, you would need to change this method accordingly.
public class SampleServicesAlertsFeedCreator {
  // Helper method to simplify creation of translated strings

  private TranslatedString translatedString(String str) {
    Translation.Builder translation = Translation.newBuilder().setText(str);

    return TranslatedString.newBuilder().addTranslation(translation).build();
  }

  public FeedMessage create() {
    Alert.Builder alert = Alert.newBuilder();

    alert.setCause(Cause.ACCIDENT);
    alert.setEffect(Effect.DETOUR);
    alert.setUrl(translatedString("http://www.example.com"));
    alert.setHeaderText(translatedString("Car accident on 14th Street"));

    alert.setDescriptionText(translatedString(
      "Please be aware that 14th Street is closed due to a car accident"
    ));

    // Loop over several route IDs to mark them as impacted

    String impactedRouteIds[] = { "102", "103" };

    for (int i = 0; i < impactedRouteIds.length; i++) {
      EntitySelector.Builder entity = EntitySelector.newBuilder();

      entity.setRouteId(impactedRouteIds[i]);

      alert.addInformedEntity(entity);
    }

    // Create the alert container entity

    FeedEntity.Builder entity = FeedEntity.newBuilder();

    entity.setId("1");
    entity.setAlert(alert);

    // Build the feed header

    FeedHeader.Builder header = FeedHeader.newBuilder();

    header.setGtfsRealtimeVersion("1.0");

    // Build the feed using the header and entity

    FeedMessage.Builder message = FeedMessage.newBuilder();

    message.setHeader(header);
    message.addEntity(entity);

    // Return the built FeedMessage
    return message.build();
  }
}
Modifying an Existing Protocol Buffer
In some circumstances you might want to modify an existing protocol buffer. For example, consider a case where you have access to a service alerts feed, but also want to add additional service alerts that you parsed from Twitter. The following diagram demonstrates this:

In this case, you can turn a FeedMessage object into a
FeedMessage.Builder object by calling to the `toBuilder()`` method.
You can then add additional alerts as required and create a new feed.
// Parse some third-party feed

URL url = new URL("http://example.com/alerts.pb");

InputStream is = url.openStream();

FeedMessage message = GtfsRealtime.FeedMessage.parseFrom(is);

// Convert existing feed into a builder

FeedMessage.Builder builder = message.toBuilder();

Alert.Builder alert = Alert.newBuilder();

// Add the details of the alert here

// Create the alert entity

FeedEntity.Builder entity = FeedEntity.newBuilder();

entity.setId("SOME ID");
entity.setAlert(alert);

// Add the new entity to the builder
builder.addEntity(entity);

// Build the update the FeedMessage
message = builder.build();
Saving a Protocol Buffer File
Once you have created a protocol buffer, the next step is to output it so other systems that read GTFS-realtime feeds can consume it (such as for others who publish real-time data in their apps or web sites).
Typically, you would generate a new version of the feed every X
seconds, then save (or upload) it each time to your web server (see the
next section for discussion on frequency of updates).
The raw protocol buffer bytes can be output using the writeTo()
method on the FeedMessage object. This method accepts an
OutputStream object as its only argument.
For example, to output the service alerts feed created in this chapter
to a file, you can use the FileOutputStream class.
Note: While there are no specific rules for naming a protocol buffer,
often the .pb extension is used.
SampleServicesAlertsFeedCreator creator = new SampleServicesAlertsFeedCreator();

FeedMessage message = creator.create();

File file = new File("/path/to/output/alerts.pb");

OutputStream outputStream = new FileOutputStream(file);

message.writeTo(outputStream);
Serving a Protocol Buffer File
The recommended content type header value to use when serving a Protocol
Buffer file is application/octet-stream. In Apache HTTP Server, you
can set the following configuration parameter to serve .pb files
with this content type:
AddType application/octet-stream .pb
If you are using nginx for your web server, you can add the following
entry to the nginx mime.types file:
types {
  ...

  application/octet-stream pb;
}
Frequency of Updates
When publishing your own feed, the frequency in which you update the feed on your web server depends on how frequently the source data is updated.
It is important to take into account the capabilities of your servers when providing a GTFS-realtime feed, as the more frequently the data is updated, the more resources that are required. Each of the GTFS-realtime message types has slightly different needs:
- Vehicle Positions. These will need updating very frequently, as presumably the vehicles on your transit network are always moving. A vehicle position feed could update as frequently as every 10-15 seconds.
- Trip Updates. These will need updating very frequently, although perhaps not as frequently as vehicle positions. Estimates would constantly be refined by new vehicle positions, but a single movement (or lack of movement) for a vehicle is not likely to make a huge difference to estimates. A trip updates feed could update every 10-30 seconds.
- Service Alerts. These will typically change far less frequently
then vehicle positions or trip updates. A system that triggered an
update to the service alerts feed only when a new alert was entered
into the system would be far more efficient than automatically doing
it every
Xseconds.
To summarize:
- Vehicle Positions. Update every 10-15 seconds.
- Trip Updates. Update every 10-30 seconds.
- Service Alerts. Triggered on demand when new data is available.
If your transit agency does not run all night, an additional efficiency would be to not update the feed at all when the network has shut down for the night.
In this case, once the last trip has finished, an empty protocol buffer would be uploaded (that is, a valid buffer but with no entities), and the next version would not be uploaded until the next morning when the first trip starts.
Conclusion
Conclusion
Thanks for reading The Definitive Guide to GTFS-realtime. I wrote this book with the intention of providing a comprehensive guide to getting started with consuming real-time data using the GTFS-realtime specification.
One of the biggest advantages GTFS-realtime has over other real-time specifications or services (such NextBus or SIRI) is that it is designed to complement GTFS feeds by sharing a common set of identifiers.
On one hand, GTFS-realtime is very straightforward, as it provides only three different types of messages (service alerts, vehicle positions and trip updates), but there are a number of complexities involved in getting started with both consuming and producing GTFS-realtime feeds, such as setting up Protocol Buffers to read feeds, or understanding the intent of trip updates.
The key takeaways from this book are:
- The different types of real-time data available in GTFS-realtime feeds.
- How to read data from a GTFS-realtime feed.
- How to apply the data you read from GTFS-realtime feeds to your own applications.
- They main concepts behind producing and publishing your own GTFS-realtime feeds.
If you have enjoyed this book, please share it or feel free to contribution improvements or changes as necessary.
Quentin Zervaas August, 2015