7. Consuming Vehicle Positions
Just like when consuming service alerts, you can loop over the
FeedEntity objects returned from getEntityList() to process
vehicle positions. If an entity contains a vehicle position, you can
retrieve it using the getVehicle() method.
for (FeedEntity entity : fm.getEntityList()) {
    if (entity.hasAlert()) {
        VehiclePosition vp = entity.getVehicle();
        processVehiclePosition(vp);
    }
}
You can then process the returned VehiclePosition object to extract
the details of the vehicle position.
Timestamp
One of the provided values is a timestamp reading of when the vehicle position reading was taken.
if (vp.hasTimestamp()) {
    Date timestamp = new Date(vp.getTimestamp() * 1000);

}
Note: The value is multiplied by 1,000 because the java.util.Date class accepts milliseconds, whereas GTFS-realtime uses whole seconds.
This value is useful because the age of a reading can dictate how the data is interpreted. For example, if your latest reading was only thirty seconds earlier, your users would realize it is very recent and therefore is probably quite accurate. On the other hand, if the latest reading was ten minutes earlier, they would see it had not updated recently and may therefore not be completely accurate.
The other way this value is useful is for determining whether to store this new vehicle position. If your previous reading for the same vehicle has the same timestamp, you can ignore this update, as nothing has changed.
Geographic Location
A VehiclePosition object contains a Position object, which
contains a vehicle's latitude and longitude, and may also include other
useful information such as its bearing and speed.
public static void processVehiclePosition(VehiclePosition vp) {
    if (vp.hasPosition()) {
        Position position = vp.getPosition();

        if (position.hasLatitude() && position.hasLongitude()) {
            float latitude = position.getLatitude();
            float longitude = position.getLongitude();

            // ...
        }

        // ...
    }
}
Even though the Position element of a VehiclePosition is
required (according to the specification), checking for it explicitly
means you can handle its omission gracefully. Remember: when consuming
GTFS-realtime data you are likely to be relying on a third-party data
provider who may or may not follow the specification correctly.
Likewise, the latitude and longitude are also required, but it is still prudent to ensure they are included. These values are treated as any floating-point numbers, so technically they may not be valid geographic coordinates.
A basic check to ensure the coordinates are valid is to ensure the latitude is between -90 and 90 and the longitude is between -180 and 180.
float latitude = position.getLatitude();
float longitude = position.getLongitude();

if (Math.abs(latitude) <= 90 && Math.abs(longitude) <= 180) {
  // Valid coordinate

}
else {
  // Invalid coordinate

}
A more advanced check would be to determine a bounding box of the data
provider's entire public transportation network from the corresponding
GTFS feed's stops.txt. You would then check that all received
coordinates are within or near the bounding box.
Note: The important lesson to take from this is that a GTFS-realtime feed may appear to adhere to the specification, but you should still perform your own sanity checks on received data.
In addition to the latitude and longitude, you can also retrieve a vehicle's speed, bearing and odometer reading.
if (position.hasBearing()) {
  float bearing = position.getBearing();

  // Degrees from 0-359. 0 is North, 90 is East, 180 is South, 270 is West

}

if (position.hasOdometer()) {
  double odometer = position.getOdometer();

  // Meters
}

if (position.hasSpeed()) {
  float speed = position.getSpeed();

  // Meters per second
}
Trip Information
In order to associate a vehicle position with a particular trip from the corresponding GTFS feed, vehicle positions may include a trip descriptor.
Note: The trip descriptor is declared as optional in the GTFS-realtime specification. Realistically, it will be hard to provide value to end-users without knowing which trip the position corresponds to. At the very least, you would need to know the route (which can be specified via the trip descriptor).
Just like with service alerts (covered in the previous chapter), there are a number of values you can retrieve from a trip descriptor to determine which trip a vehicle position belongs to. The following listing demonstrates how to access this data:
if (vp.hasTrip()) {
  TripDescriptor trip = vp.getTrip();

  if (trip.hasTripId()) {
    String tripId = trip.getTripId();

  }

  if (trip.hasRouteId()) {
    String routeId = trip.getRouteId();

  }

  if (trip.hasStartDate()) {
    String startDate = trip.getStartDate();

  }

  if (trip.hasStartTime()) {
    String startTime = trip.getStartTime();

  }

  if (trip.hasScheduleRelationship()) {
    ScheduleRelationship sr = trip.getScheduleRelationship();

  }
}
Vehicle Identifiers
There are a number of values available in a vehicle position entity by which to identify a vehicle. You can access an internal identifier (not for public display), a label (such as a vehicle number painted on to a vehicle), or a license plate, as shown in the following listing:
if (vp.hasVehicle()) {
  VehicleDescriptor vehicle = vp.getVehicle();

  if (vehicle.hasId()) {
    String id = vehicle.getId();

  }

  if (vehicle.hasLabel()) {
    String label = vehicle.getLabel();

  }

  if (vehicle.hasLicensePlate()) {
    String licensePlate = vehicle.getLicensePlate();

  }
}
The vehicle descriptor and the values contained within are all optional. In the case where this information is not available, you can use the trip descriptor provided with each vehicle position to match up vehicle positions across multiple updates.
Being able to match up the trip and/or vehicle reliably over subsequent updates allows you reliably track the ongoing position changes for a particular vehicle. For instance, if you wanted to animate the vehicle moving on a map as new positions were received, you would need to know that each update corresponds to a particular vehicle.
Current Stop
Each vehicle position record can be associated with a single stop. If specified, this stop must appear in the corresponding GTFS feed.
The stop can be identified either by the stop_id value, or by using
the current_stop_sequence value. If you use the stop sequence, the
stop can be determined by finding the corresponding record in the GTFS
feed's stop_times.txt file.
if (vp.hasStopId()) {
  String stopId = vp.getStopId();

}

if (vp.hasCurrentStopSequence()) {
  int sequence = vp.getCurrentStopSequence();

}
Note: It is possible for the same stop to be visited multiple times in a single trip (consider a loop service, although there are other instances when this may also happen). The stop sequence value can be useful to disambiguate this case.
On its own, knowing the stop has no meaning without context. The
current_status field provides this context, indicating that the
vehicle is either:
- In transit to the stop (it is the next stop but the vehicle is not yet nearby)
- About to arrive at the stop
- Currently stopped at the stop.
According to the GTFS-realtime specification, you can only make use of
current_status if the stop sequence is specified.
The following code shows how you can retrieve and check the value of the stop status.
if (vp.hasCurrentStopSequence()) {
  int sequence = vp.getCurrentStopSequence();

  if (vp.hasCurrentStatus()) {
    VehicleStopStatus status = vp.getCurrentStatus();

    switch (status.getNumber()) {
    case VehicleStopStatus.IN_TRANSIT_TO_VALUE:
      // ...

    case VehicleStopStatus.INCOMING_AT_VALUE:
      // ...

    case VehicleStopStatus.STOPPED_AT_VALUE:
      // ...

    }
  }
}
Congestion Levels
The other two values that may be included with a vehicle position relate to the congestion inside and outside of the vehicle.
The congestion_level value indicates the flow of traffic. This value does
not indicate whether or not the vehicle is running to schedule, since congestion
levels are typically accounted for in scheduling.
The following code shows how you can check the congestion level value:
if (vp.hasCongestionLevel()) {
  CongestionLevel congestion = vp.getCongestionLevel();

  switch (congestion.getNumber()) {
  case CongestionLevel.UNKNOWN_CONGESTION_LEVEL_VALUE:
    // ...

  case CongestionLevel.RUNNING_SMOOTHLY_VALUE:
    // ...

  case CongestionLevel.STOP_AND_GO_VALUE:
    // ...

  case CongestionLevel.SEVERE_CONGESTION_VALUE:
    // ...

  case CongestionLevel.CONGESTION_VALUE:
    // ...

  }
}
The occupancy_status value indicates how full the vehicle currently
is. This can be useful to present to your users so they know what to
expect before the vehicle arrives. For instance:
- A person with a broken leg may not want to travel on a standing room-only bus
- Someone traveling late at night might prefer a taxi over an empty train for safety reasons
- If a bus is full and not accepting passengers, someone may stay at home for longer until a bus with seats is coming by.
You can check the occupancy status of a vehicle as follows:
if (vp.hasOccupancyStatus()) {
  OccupancyStatus status = vp.getOccupancyStatus();

  switch (status.getNumber()) {
  case OccupancyStatus.EMPTY_VALUE:
    // ...

  case OccupancyStatus.MANY_SEATS_AVAILABLE_VALUE:
    // ...

  case OccupancyStatus.FEW_SEATS_AVAILABLE_VALUE:
    // ...

  case OccupancyStatus.STANDING_ROOM_ONLY_VALUE:
    // ...

  case OccupancyStatus.CRUSHED_STANDING_ROOM_ONLY_VALUE:
    // ...

  case OccupancyStatus.FULL_VALUE:
    // ...

  case OccupancyStatus.NOT_ACCEPTING_PASSENGERS_VALUE:
    // ...

  }
}
Determining a Vehicle's Bearing
One of the values that can be specified in a GTFS-realtime vehicle position update is the bearing of the vehicle being reported. This value indicates either the direction the vehicle is facing, or the direction towards the next stop.
Ideally, the bearing contains the actual direction that the vehicle is facing, not the direction to the next stop, since it is possible for this value to be inaccurate. For example, if a Northbound vehicle is stopped at a stop (that is, directly beside it), then the calculated bearing would indicate the vehicle was facing East, not North.
Note: This example assumes that the vehicle is in a country that drives on the right-hand side of the road.
There are several ways to calculate a vehicle's bearing if it is not specified in a GTFS-realtime feed:
- Determine the direction towards the next stop
- Determine the direction using a previous vehicle position reading
- A combination of the above.
Note: The GTFS-realtime specification states that feed providers should not include the bearing if it is calculated using previous positions. This is because consumers of the feed can calculate this, as shown in the remainder of this chapter.
Bearing to Next Stop
In order to determine the bearing from the current location to the next stop, there are two values you need:
- Vehicle position. This is provided in the
latitudeandlongitudefields of the vehicle position. - Position of the next stop. This is provided by the
stop_idorcurrent_stop_sequencefields of the vehicle position.
Note: Many GTFS-realtime vehicle position feeds do not include information about the next stop, and consequently this technique will not work in those instances. If this is the case, using the previous reading to determine the bearing would be used, as shown later in Bearing From Previous Position.
The following formula is used to determine the bearing between the starting location and the next stop:
θ = atan2( sin Δλ ⋅ cos φ2 , cos φ1 ⋅ sin φ2 − sin φ1 ⋅ cos φ2 ⋅ cos Δλ )
In this equation, the starting point is indicated by 1, while the next stop is represented by 2. Latitude is represented by φ, while longitude is represented by λ. For example, φ2 means the latitude of the next stop.
The resultant value θ is the bearing between the two points in radians, and must then be converted to degrees (0-360).
This equation can be represented in Java as follows. It accepts that latitude and longitude of two points in degrees, and returns the bearing in degrees.
public static double calculateBearing(double lat1Deg, double lon1Deg, double lat2Deg, double lon2Deg) {

  // Convert all degrees to radians
  double lat1 = Math.toRadians(lat1Deg);
  double lon1 = Math.toRadians(lon2Deg);
  double lat2 = Math.toRadians(lat2Deg);
  double lon2 = Math.toRadians(lon2Deg);

  // sin Δλ ⋅ cos φ2
  double y = Math.sin(lon2 - lon1) * Math.cos(lat2);

  // cos φ1 ⋅ sin φ2 − sin φ1 ⋅ cos φ2 ⋅ cos Δλ
  double x = Math.cos(lat1) * Math.sin(lat2) - Math.sin(lat1) * Math.cos(lat2) * Math.cos(lon2 - lon1);

  // Calculate the bearing in radians
  double bearingRad = Math.atan2(y, x);

  // Convert radians to degrees
  double bearingDeg = Math.toDegrees(bearingRad);

  // Ensure x is positive, in the range of 0 <= x < 360
  if (bearingDeg < 0) {
    bearingDeg += 360;
  }

  return bearingDeg;
}
One thing to be aware of when using the next stop to determine bearing
is the current_status value of the vehicle position (if specified).
If the value is STOPPED_AT, then the calculated angle might be
significantly wrong, since the vehicle is likely directly next to the
stop. In this instance, you should either use the next stop, or
determine the bearing from the previous position reading.
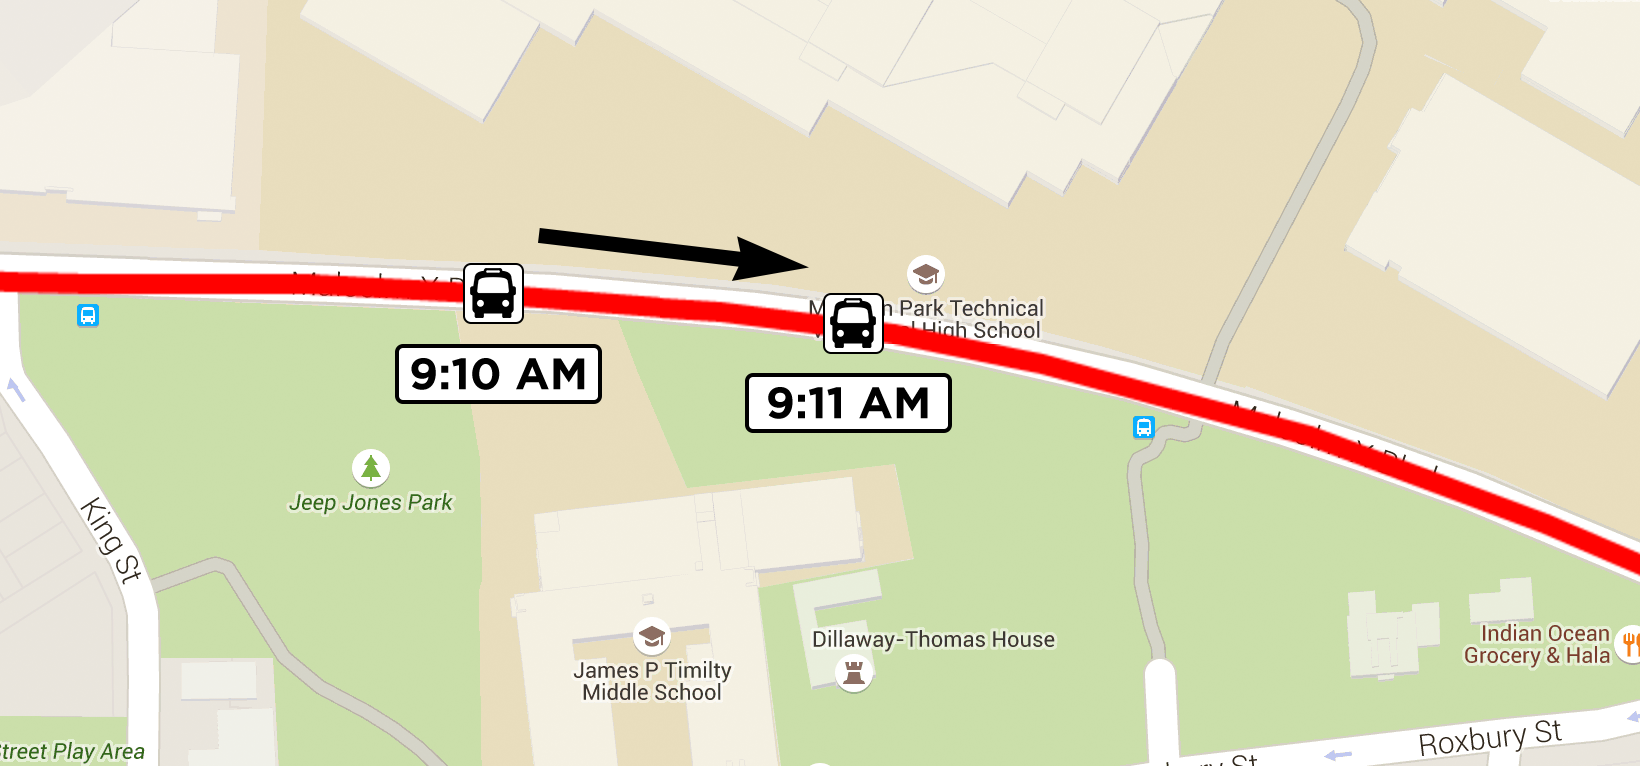
Bearing From Previous Position
Similar to calculating a vehicle's bearing using the direction to the next stop, you can also use a previous reading to calculate the vehicle's direction.
The following diagram shows two readings for the same vehicle, as well as the calculated bearing from the first point to the second.
To calculate the bearing in this way, you need the following data:
- Current vehicle position. This is provided in the
latitudeandlongitudefields of the vehicle position. - Previous vehicle position. This should be the most recent vehicle position recorded prior to receiving the current vehicle position. Additionally, this position must represent a different location to the current position. If a vehicle is stationary for several minutes, you may receive several locations for the vehicle with the same coordinates.
Note: In the case of multiple readings at the same location, you should use a minimum distance threshold to decide whether or not the location is the same. For instance, you may decide that the two previous locations must be more than, say, 10 meters to use it for comparison.
It is also necessary to check the age of the previous reading. If the previous reading is more than a minute or two old, it is likely that the vehicle has travelled far enough to render the calculated bearing meaningless.
Combination
These two strategies are useful to approximate a vehicle's bearing if it is not specified in a vehicle position message, but they are still reliant on certain data being available.
The first technique needs to know the next stop, while the second needs a previous vehicle position reading.
Your algorithm to determine a vehicle's position could be as follows:
- Use the provided bearing value in the vehicle position if this available.
- Otherwise, if you have a recent previous reading, calculate the direction using that and the current reading.
- Otherwise, if the next stop is known, show the bearing of the vehicle towards the stop.